Group Management
Group Management
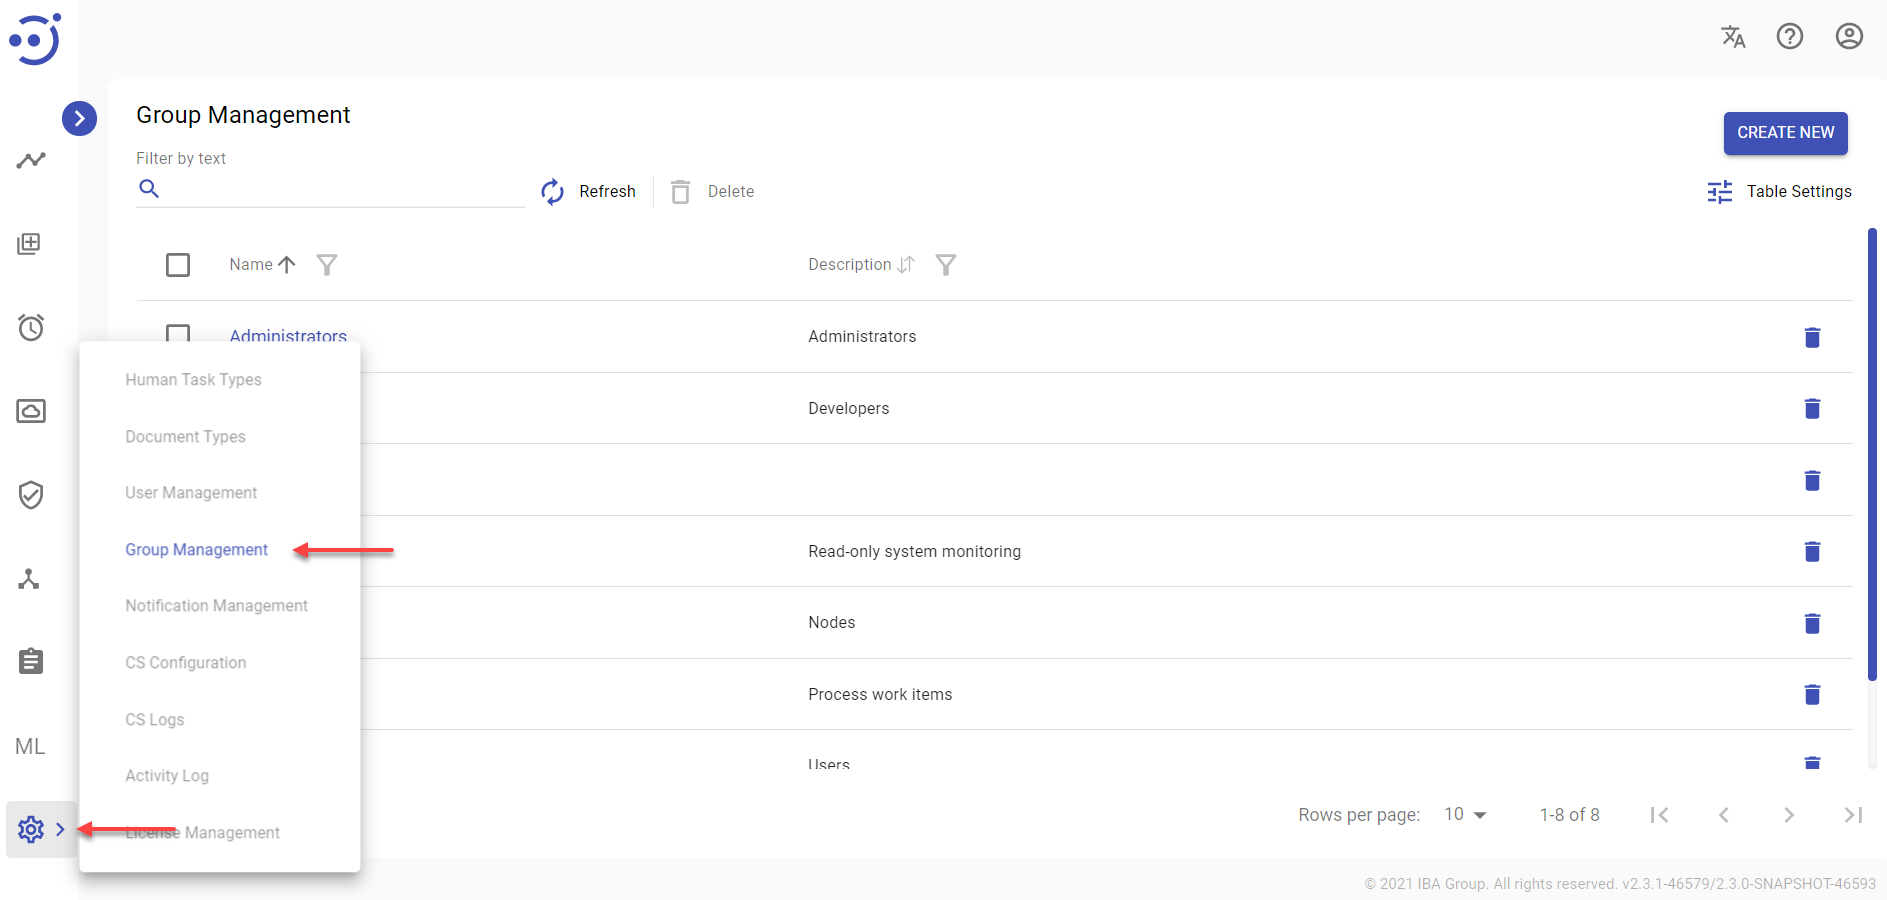
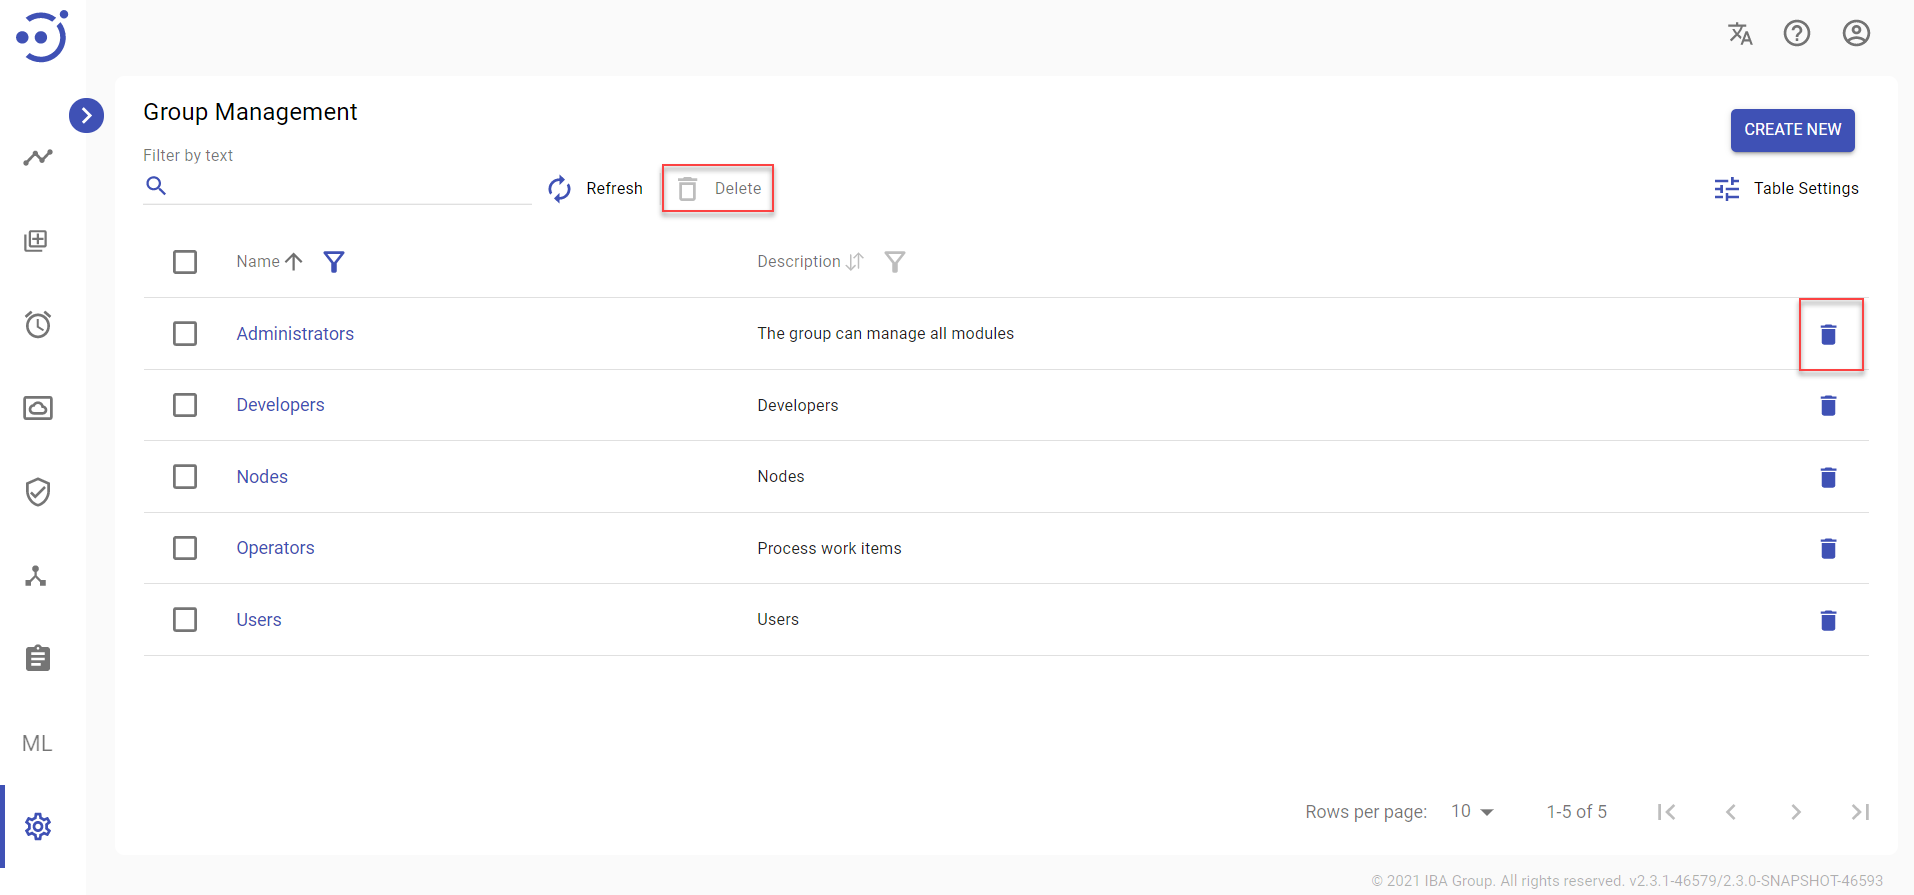
The Group Management module displays a catalog of all the user groups and provides access to all group management functions.
Groups allow to combine users and assign roles to them. See User Management, View/Edit Users in a Group, View/Edit Roles in a Group, View/Edit Third Party Roles in a Group.
To manage Groups, users must have Group Management modification permissions. See Role Permissions.
You can access the module by clicking Administration → Group Management. Required Permission: Group-READ and Administration-READ. See Role Permissions.
EasyRPA Control Server allows to perform the following actions:
- Create a new group via CREATE NEW icon above the table.
- Edit an existing group via Edit Group popup panel and its roles and users via Group Details.
- Delete an existing group via the recycle bin control icon in the table row or Delete icon above the table.
- Pull the last updates from the server via Refresh icon.
Table Settings
Table settings allow you to manage the table view. Click the icon ![]() to start working with the table settings. The table settings can be managed with the following buttons:
to start working with the table settings. The table settings can be managed with the following buttons:
- Advanced filter - to switch the advanced filters for the columns.
- Columns Display - to select the columns that will be displayed in the table.
- Apply - to apply the changes made to the table settings.
- Сancel - to cancel the last actions with the table settings.
Filter by text
Filtering allows you to search the group by all columns.
Advanced filters by columns
Advanced Filter allows you to extract a list from a table with predefined criteria. Click the icon ![]() to start working with the advanced filter. The advanced filters can be managed with the following buttons:
to start working with the advanced filter. The advanced filters can be managed with the following buttons:
- Clear filter - to reset all the proposed advanced filter criteria for the column.
- Сancel - to cancel the last actions with the proposed criteria for the column.
Apply - to filter the table according to the proposed criteria for the column.
Sorting
Ascending/descending sorting is allowed for all columns.
Create a New Group
To create a group:
- Go to the Group Management module and click CREATE NEW. Required Permission: Group-CREATE. See Role Permissions.
- In the New group popup panel:
- Enter a unique Name to distinguish the user group.
- Provide a user group Description.
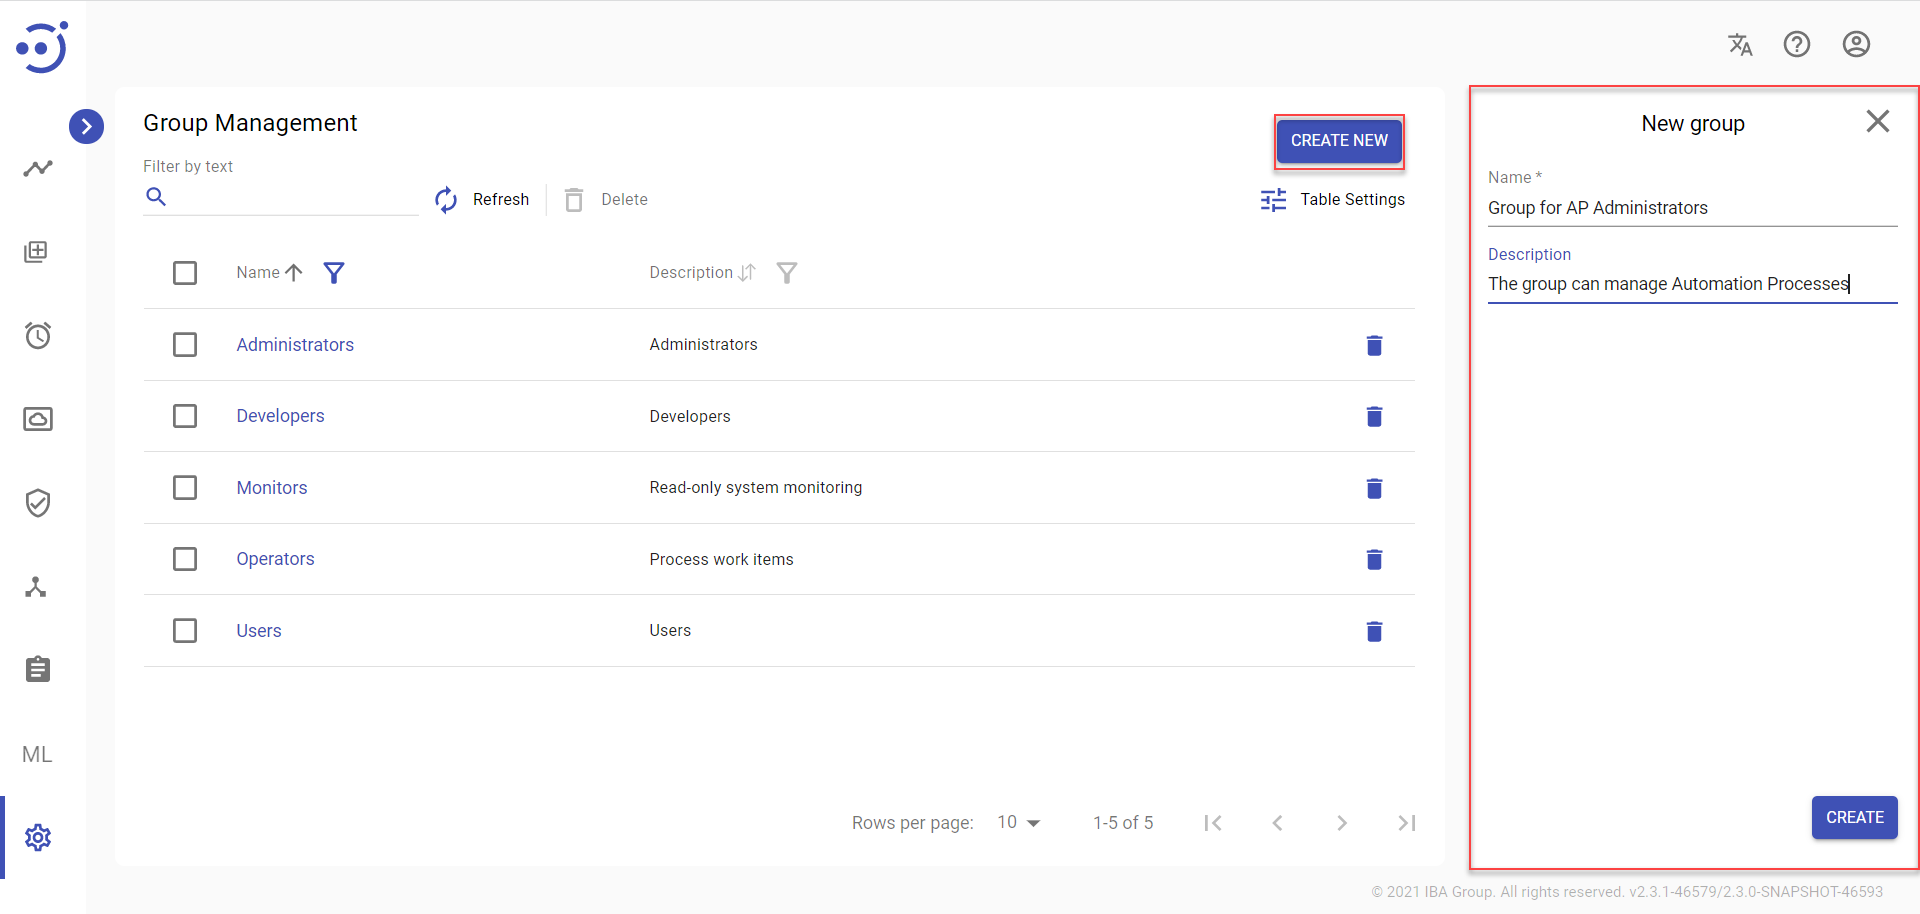
3. Click CREATE.
To combine users and assign roles to them:
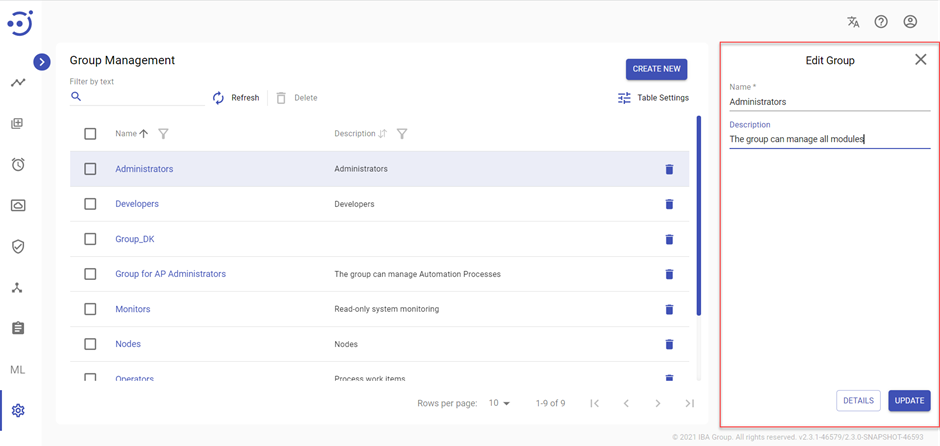
View/Edit a Group Properties
To view or edit group information, click the corresponding group row, make changes in the popup panel, and click UPDATE. Required Permissions: Group-READ,UPDATE. See Role Permissions.
View/Edit Roles in a Group
To view or edit roles in a group, click Name of a Group, or click the corresponding group row and click DETAILS:
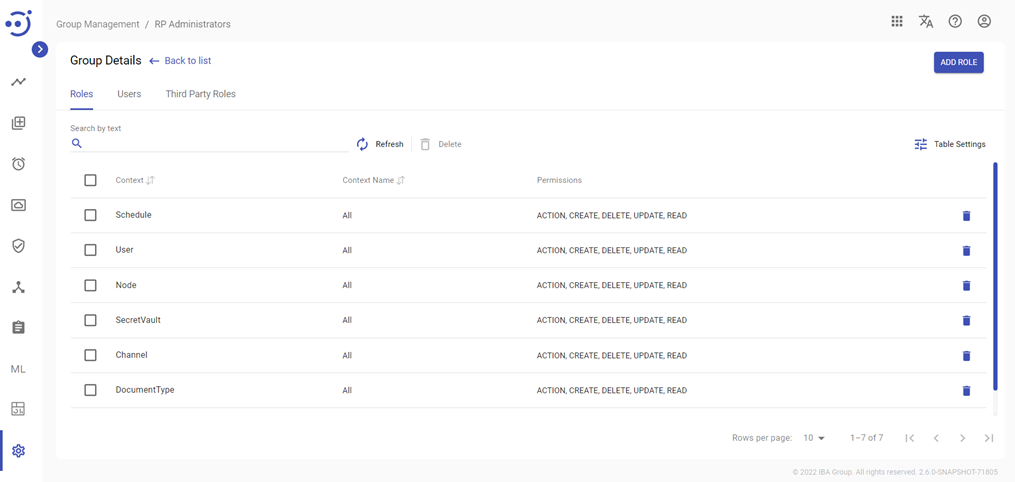
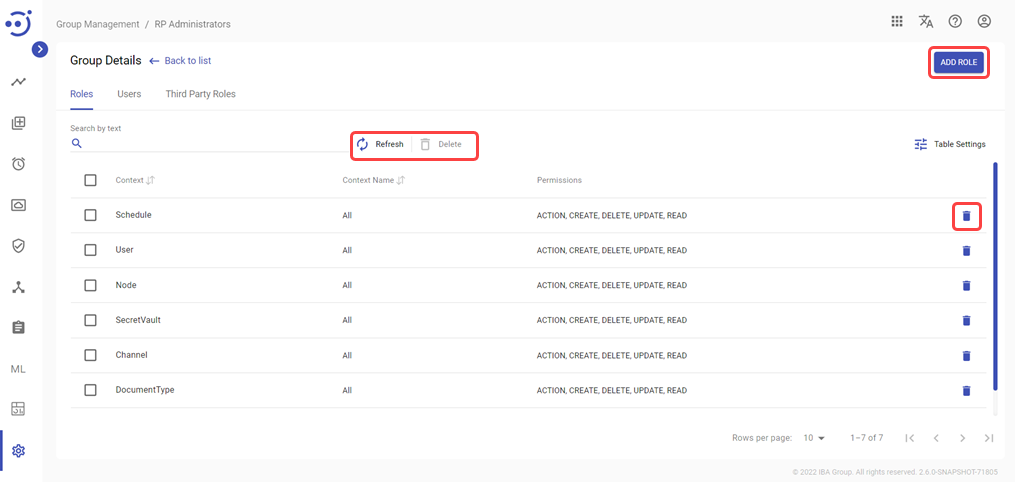
Control Icons
- ADD ROLE - to add a role in the group. Required Permissions: Group-READ,UPDATE. See Role Permissions.
- Refresh - to pull the last updates from the server via Refresh icon.
- Delete - to delete the selected role in the group (via the recycle bin control icon in the table row or Delete icon above the table). Required Permissions: Group-READ,UPDATE. See Role Permissions.
When adding a role you are able to choose:
- Context - to specify what module/modues you are going to manage. See Role Permissions.
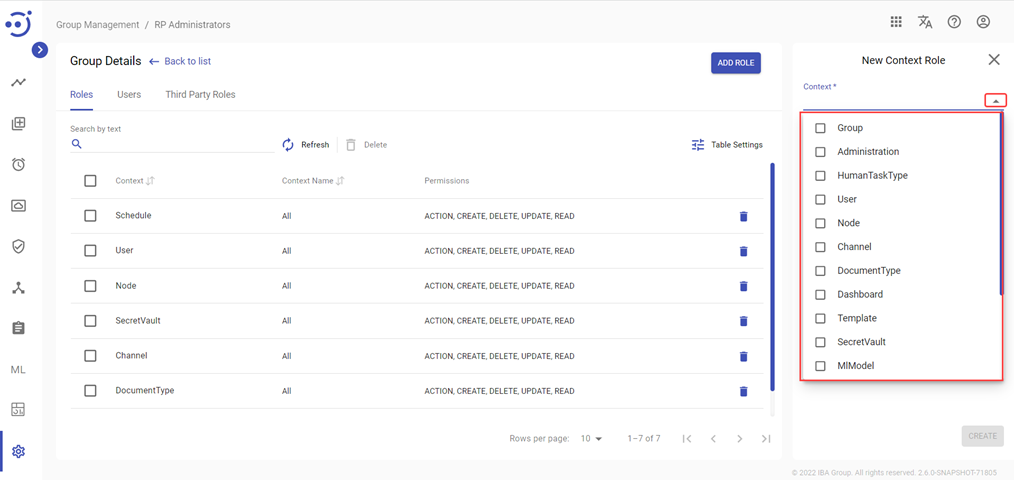
- Context Name - to choose all or a specific entity/entities to manage.
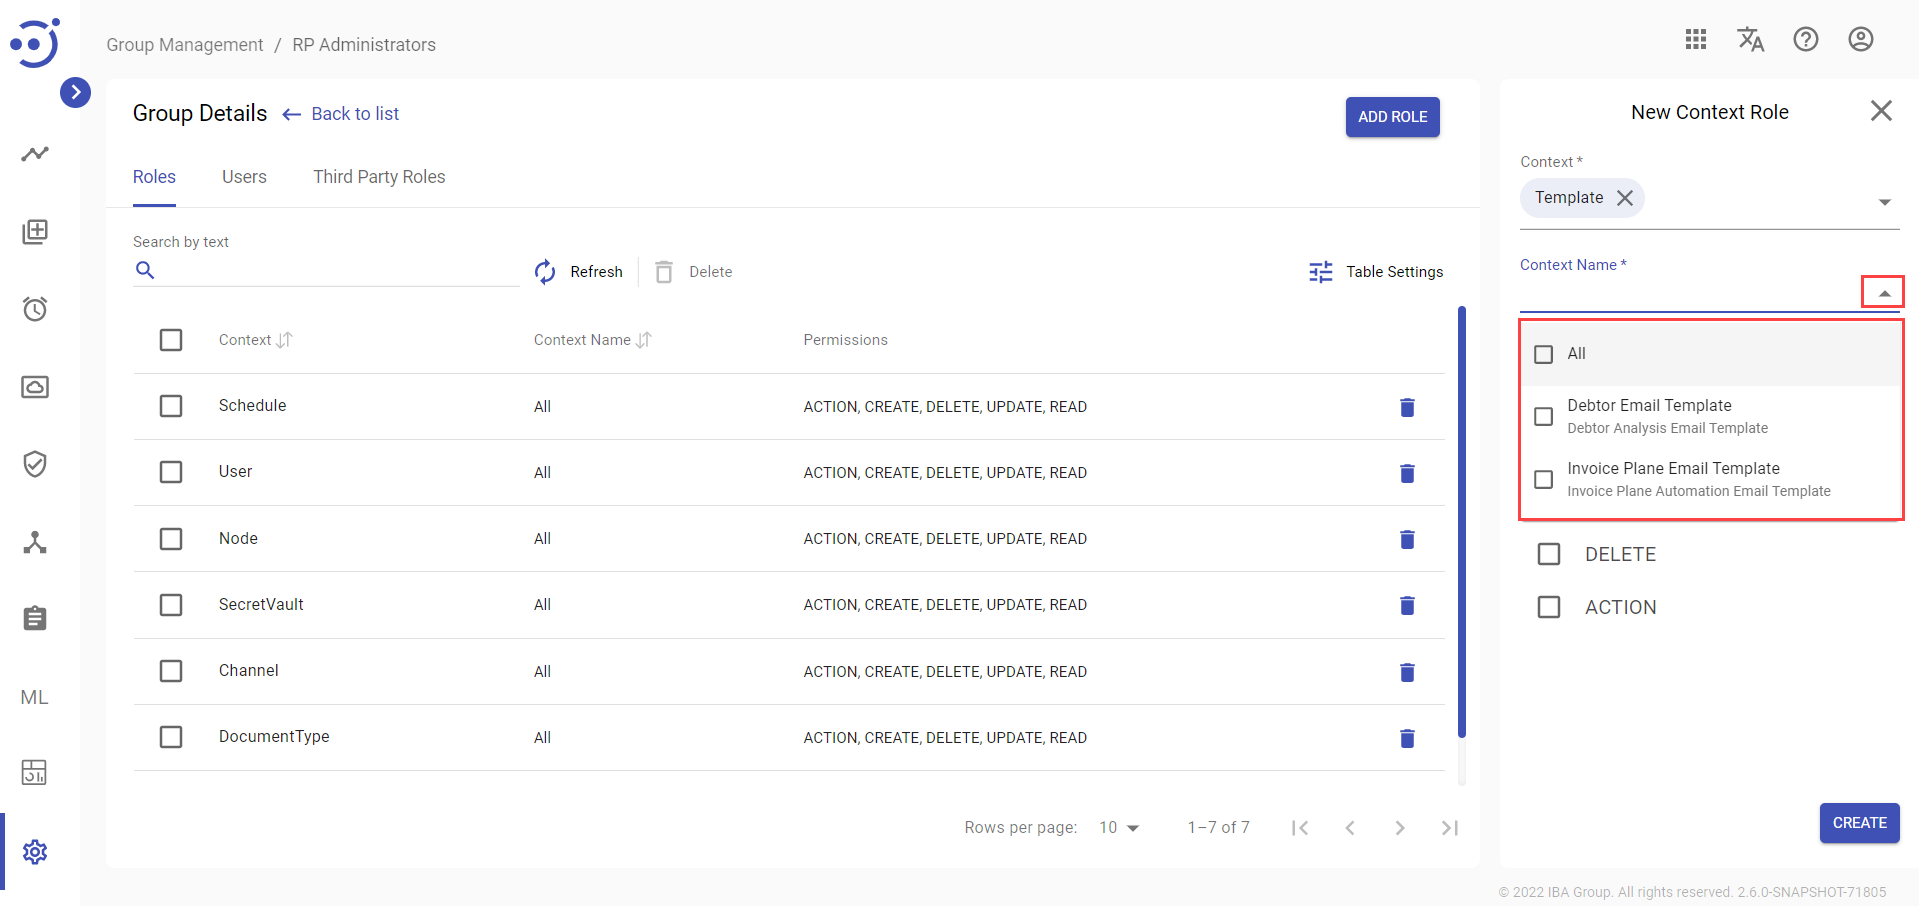
- Role Permissions - to select appropriate role permissions from the list. See Role Permissions.
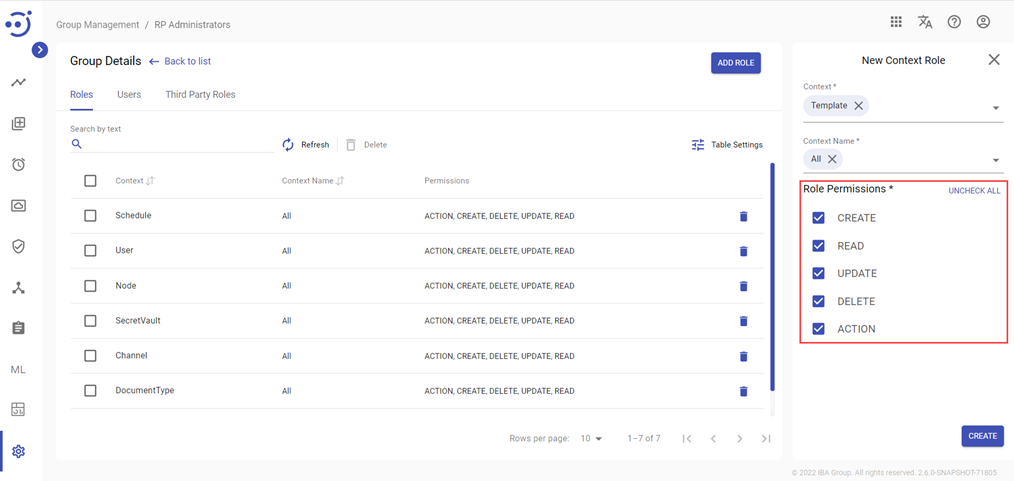
Table Settings
Table settings allow you to manage the table view. Click the icon ![]() to start working with the table settings. The table settings can be managed with the following buttons:
to start working with the table settings. The table settings can be managed with the following buttons:
- Advanced filter - to switch the advanced filters for the columns.
- Columns Display - to select the columns that will be displayed in the table.
- Apply - to apply the changes made to the table settings.
- Сancel - to cancel the last actions with the table settings.
Filter by text
Filtering allows you to search the role by the columns: Context, Context Name.
Advanced filters by columns
Advanced Filter allows you to extract a list from a table with predefined criteria. Click the icon ![]() to start working with the advanced filter. The advanced filters can be managed with the following buttons:
to start working with the advanced filter. The advanced filters can be managed with the following buttons:
- Clear filter - to reset all the proposed advanced filter criteria for the column.
- Сancel - to cancel the last actions with the proposed criteria for the column.
Apply - to filter the table according to the proposed criteria for the column.
Sorting
Ascending/descending sorting is allowed by the columns: Context, Context Name.
View/Edit Users in a Group
To view or edit users in a group, click Name of a Group and open Users tab, or click the corresponding group row, click DETAILS and open Users tab:

Control Icons
- ADD USER - to add a user in the group. Required Permissions: Group-READ,UPDATE and User-READ. See Role Permissions.
- Refresh - to pull the last updates from the server via Refresh icon.
- Delete - to delete the selected user in the group (via the recycle bin control icon in the table row or Delete icon above the table). Required Permissions: Group-READ,UPDATE. See Role Permissions.

Table Settings
Table settings allow you to manage the table view. Click the icon ![]() to start working with the table settings. The table settings can be managed with the following buttons:
to start working with the table settings. The table settings can be managed with the following buttons:
- Advanced filter - to switch the advanced filters for the columns.
- Columns Display - to select the columns that will be displayed in the table.
- Apply - to apply the changes made to the table settings.
- Сancel - to cancel the last actions with the table settings.
Filter by text
Filtering allows you to search the user by the columns: Username, E-mail, Full Name, Status.
Advanced filters by columns
Advanced Filter allows you to extract a list from a table with predefined criteria. Click the icon ![]() to start working with the advanced filter. The advanced filters can be managed with the following buttons:
to start working with the advanced filter. The advanced filters can be managed with the following buttons:
- Clear filter - to reset all the proposed advanced filter criteria for the column.
- Сancel - to cancel the last actions with the proposed criteria for the column.
Apply - to filter the table according to the proposed criteria for the column.
Sorting
Ascending/descending sorting is allowed for the columns: Username, E-mail, Full Name, Creation Date.
View/Edit Third Party Roles in a Group
To view or edit Third Party Roles in a group, click Name of a group and open Third Party Roles tab, or click the corresponding group row, click DETAILS and open Third Party Roles tab:

The Third Party Roles tab displays a list of Third Party Servers connected to the EasyRPA Control Server.
There are two Third Party Servers which you can manage to assign roles to users in a group to grant access to them:
- MinIO. See MinIO Roles.
- Grafana. See Grafana Roles.
Control Icons
- UPDATE ROLES - to save the result of updating granted access to a Third Party Server. Required Permissions: Group-READ,UPDATE. See Role Permissions.
- Delete - to delete granted access to a Third Party Server (via the recycle bin control icon in the table row). Required Permissions: Group-READ,UPDATE. See Role Permissions.

MinIO Roles
MinIO drop-down menu contains a list of roles which can be selected to grant access to MinIO Server.

There are five types of MinIO Roles:
- consoleAdmin - grants complete access to all S3 and administrative API operations against all resources on the MinIO deployment;
- diagnostics - grants permission to perform diagnostic actions on the MinIO deployment:
- listing server trace;
- profiling;
- listing console logs on terminal;
- listing server info;
- listing top locks;
- obtaining cluster on-board diagnostics;
- retrieving metrics related to current bandwidth consumption;
- access to MinIO metrics;
- readonly - grants read-only permissions on any object on the MinIO deployment to control access to the GetBucketLocation S3 API operation and the GetObject S3 API operation;
- readwrite - grants read and write permissions for all buckets and objects on the MinIO server to perform any S3 operation against a given resource;
- writeonly - grants write-only permissions to any namespace (bucket and path to object) the MinIO deployment to control access to the PutObject S3 API operation.
One or several Roles can be marked with checkmarks to grant partial or full access to MinIO Server.
For more details about MinIO Roles refer to MinIO documentation - Policy Management.
Grafana Roles
Grafana drop-down menu contains a list of roles one of which can be selected to grant access to Grafana Server.

There are three types of Grafana Roles:
- Viewer
- Admin
- Editor
The table below compares what each Role can do:
| Admin | Editor | Viewer | |
|---|---|---|---|
| View dashboards | x | x | x |
| Add, edit, delete dashboards | x | x | |
| Add, edit, delete folders | x | x | |
| View playlists | x | x | x |
| Create, update, delete playlists | x | x | |
| Access Explore | x | x | |
| View alert notification channels | x | x | x |
| Add, edit, or delete alert notification channels | x | x | |
| Add, edit, delete data sources | x | ||
| Add and edit users | x | ||
| Add and edit teams | x | ||
| Change organizations settings | x | ||
| Change team settings | x | ||
| Configure app plugins | x |
For more details about Grafana Roles refer to Grafana documentation - Organization roles.
![]() If a user is a member of multiple groups, each with different Grafana Roles, the user will be granted access to Grafana Server according to the higher priority Grafana Role. The priority is assigned in the following order: Admin -> Editor -> Viewer.
If a user is a member of multiple groups, each with different Grafana Roles, the user will be granted access to Grafana Server according to the higher priority Grafana Role. The priority is assigned in the following order: Admin -> Editor -> Viewer.
Delete an Existing Group
To delete the user group, use the recycle bin control icon in the table row or Delete icon above the table. Required Permissions: Group-READ,DELETE. See Role Permissions.
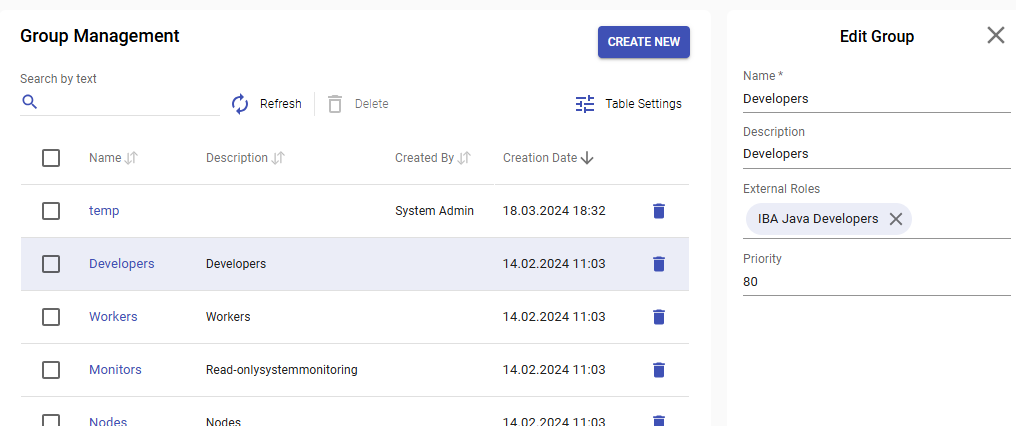
Setting up groups for authorizing users from LDAP.
If LDAP does authorization, for each authenticated LDAP user LDAP roles will be extracted and translated into platform authorization groups.
To setup LDAP role mappings for platform groups and priorities for default user group calculation please additionally specify the following optional Group fields:
- External Roles - a list of strings that will be used to map granted LDAP roles of an LDAP user to the group. Please note that the role is case sensitive.
- Priority - a positive integer that is used to calculate LDAP user default group from all granted groups - bigger priority means higher chance for this group to be chosen as default.