Automation Processes
Automation Processes
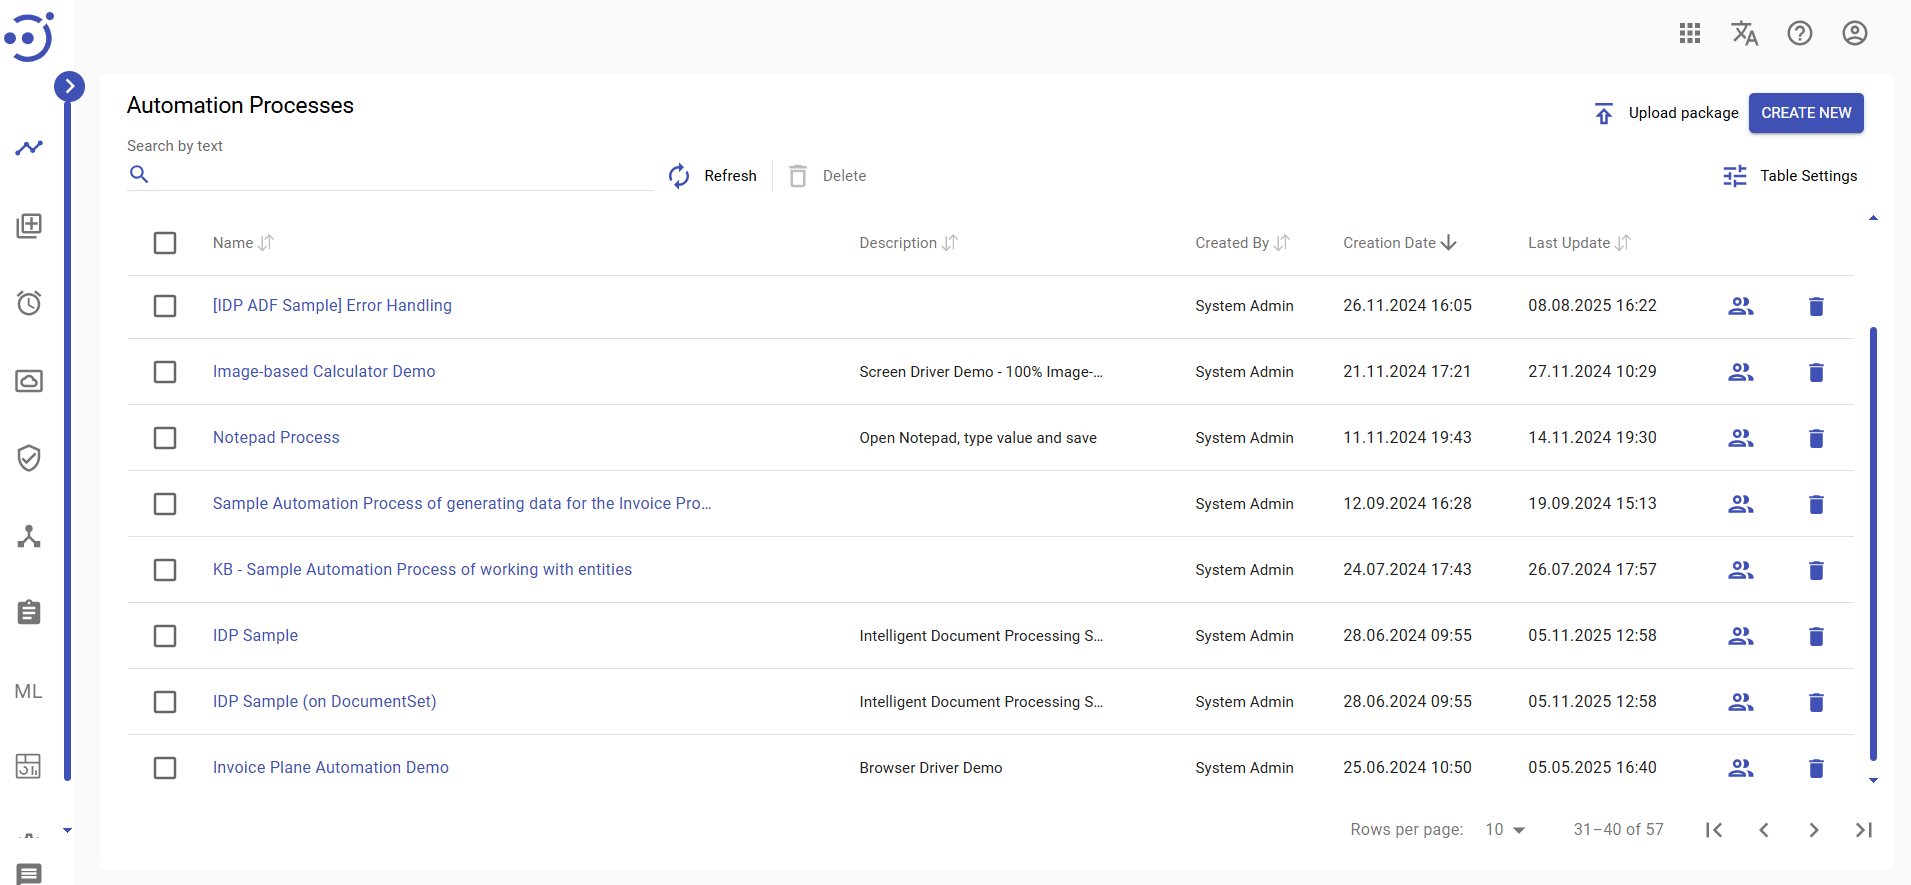
The Automation Processes module displays a catalog of automation processes defined by the system and ready to run.
There are several sample automation processes supplied with the EasyRPA Control Server, such as Debtor Analysis, Invoice Plane Automation, etc. You can refer to the RPA Samples Library for more details on how to set up the automation processes samples.
To access the Automation Processes module, you need to be granted AutomationProcess-READ permission. See Role Permissions.
Manage existing Automation Processes
The EasyRPA control server allows managing the automation processes catalog.
Columns Description
- Name - the аutomation process name.
- Capabilities - the list of capabilities required for the automation process execution.
- Created By - the name of the user, who created the automation process.
- Creation Date - the date and time of the automation process creation.
- Changed by - the name of the user, who changed the automation process details.
- Last Update - the last date and time when the automation process was changed.
Table Settings
Table settings allow you to manage the table view. Click the icon ![]() to start working with the table settings. The table settings can be managed with the following buttons:
to start working with the table settings. The table settings can be managed with the following buttons:
- Advanced filter - to switch the advanced filters for the columns.
- Columns Display - to select the columns that will be displayed in the table.
- Apply - to apply the changes made to the table settings.
- Сancel - to cancel the last actions with the table settings.
Filter by text
Filtering allows you to search the automation process by its name and author (columns Name, Created By respectively).
Advanced filters by columns
Advanced Filter allows you to extract a list from a table with predefined criteria. Click the icon ![]() to start working with the advanced filter. The advanced filters can be managed with the following buttons:
to start working with the advanced filter. The advanced filters can be managed with the following buttons:
- Clear filter - to reset all the proposed advanced filter criteria for the column.
- Сancel - to cancel the last actions with the proposed criteria for the column.
Apply - to filter the table according to the proposed criteria for the column.
Sorting
Ascending/descending sorting is allowed by the columns: Name, Creation Date, Last Update.
Control Icons
- Delete - to delete the automation process. Required Permission: AutomationProcess-DELETE.
Create a new Automation Process
To create a new Automation Process, you need to:
- Navigate to the Automation Processes module.
- Click Create New.

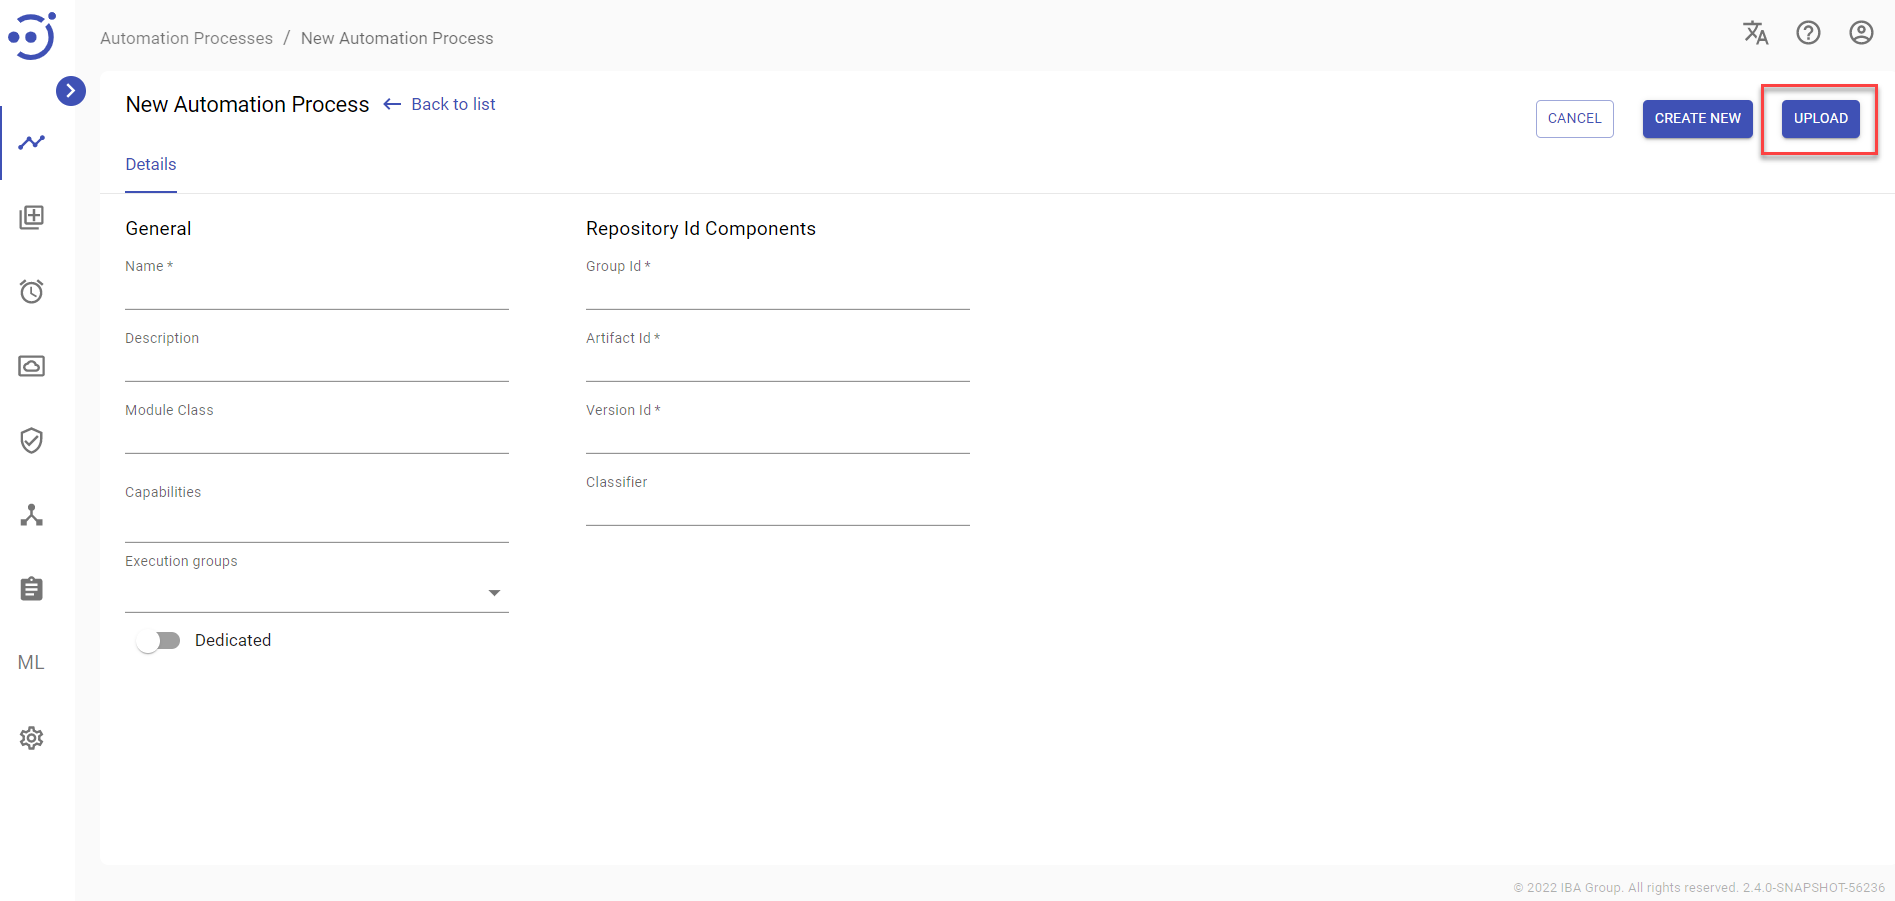
- Fill in General automation process details:
- a unique name to distinguish the automation process (required).
- a short description of the automation process functionalities (optional).
- a name of the module class for execution (optional).
 It is important to indicate module class if there are several in the package. Otherwise, the system will execute the first found module class from the package.
- capabilities - capability labels required for the automation process execution. You can choose available capabilities in the dropdown (optional).
- or dedicated nodes where the dedicated automation process is ready to run (available if the Dedicated toggle is on).
- switch the Dedicated toggle button, if the automation process is dedicated. See Dedicated Automation Process.
- Fill in the Repository Id Components:
- Group Id (required, example: eu.ibagroup);
- Artifact Id (required, example: easy-rpa-sample);
- Version Id (required, example: 0.1-SNAPSHOT);
- Classifier - a unique identifier that reflects the type of resource being loaded (optional).
You can find the necessary module class and repository id values for all the available samples in the corresponding section. See RPA Samples Library.

- Click Create New.
If there are capabilities required to start the automation process they are displayed for each task.
To create a new automation process, you need to be granted AutomationProcess-CREATE permission. See Role Permissions.
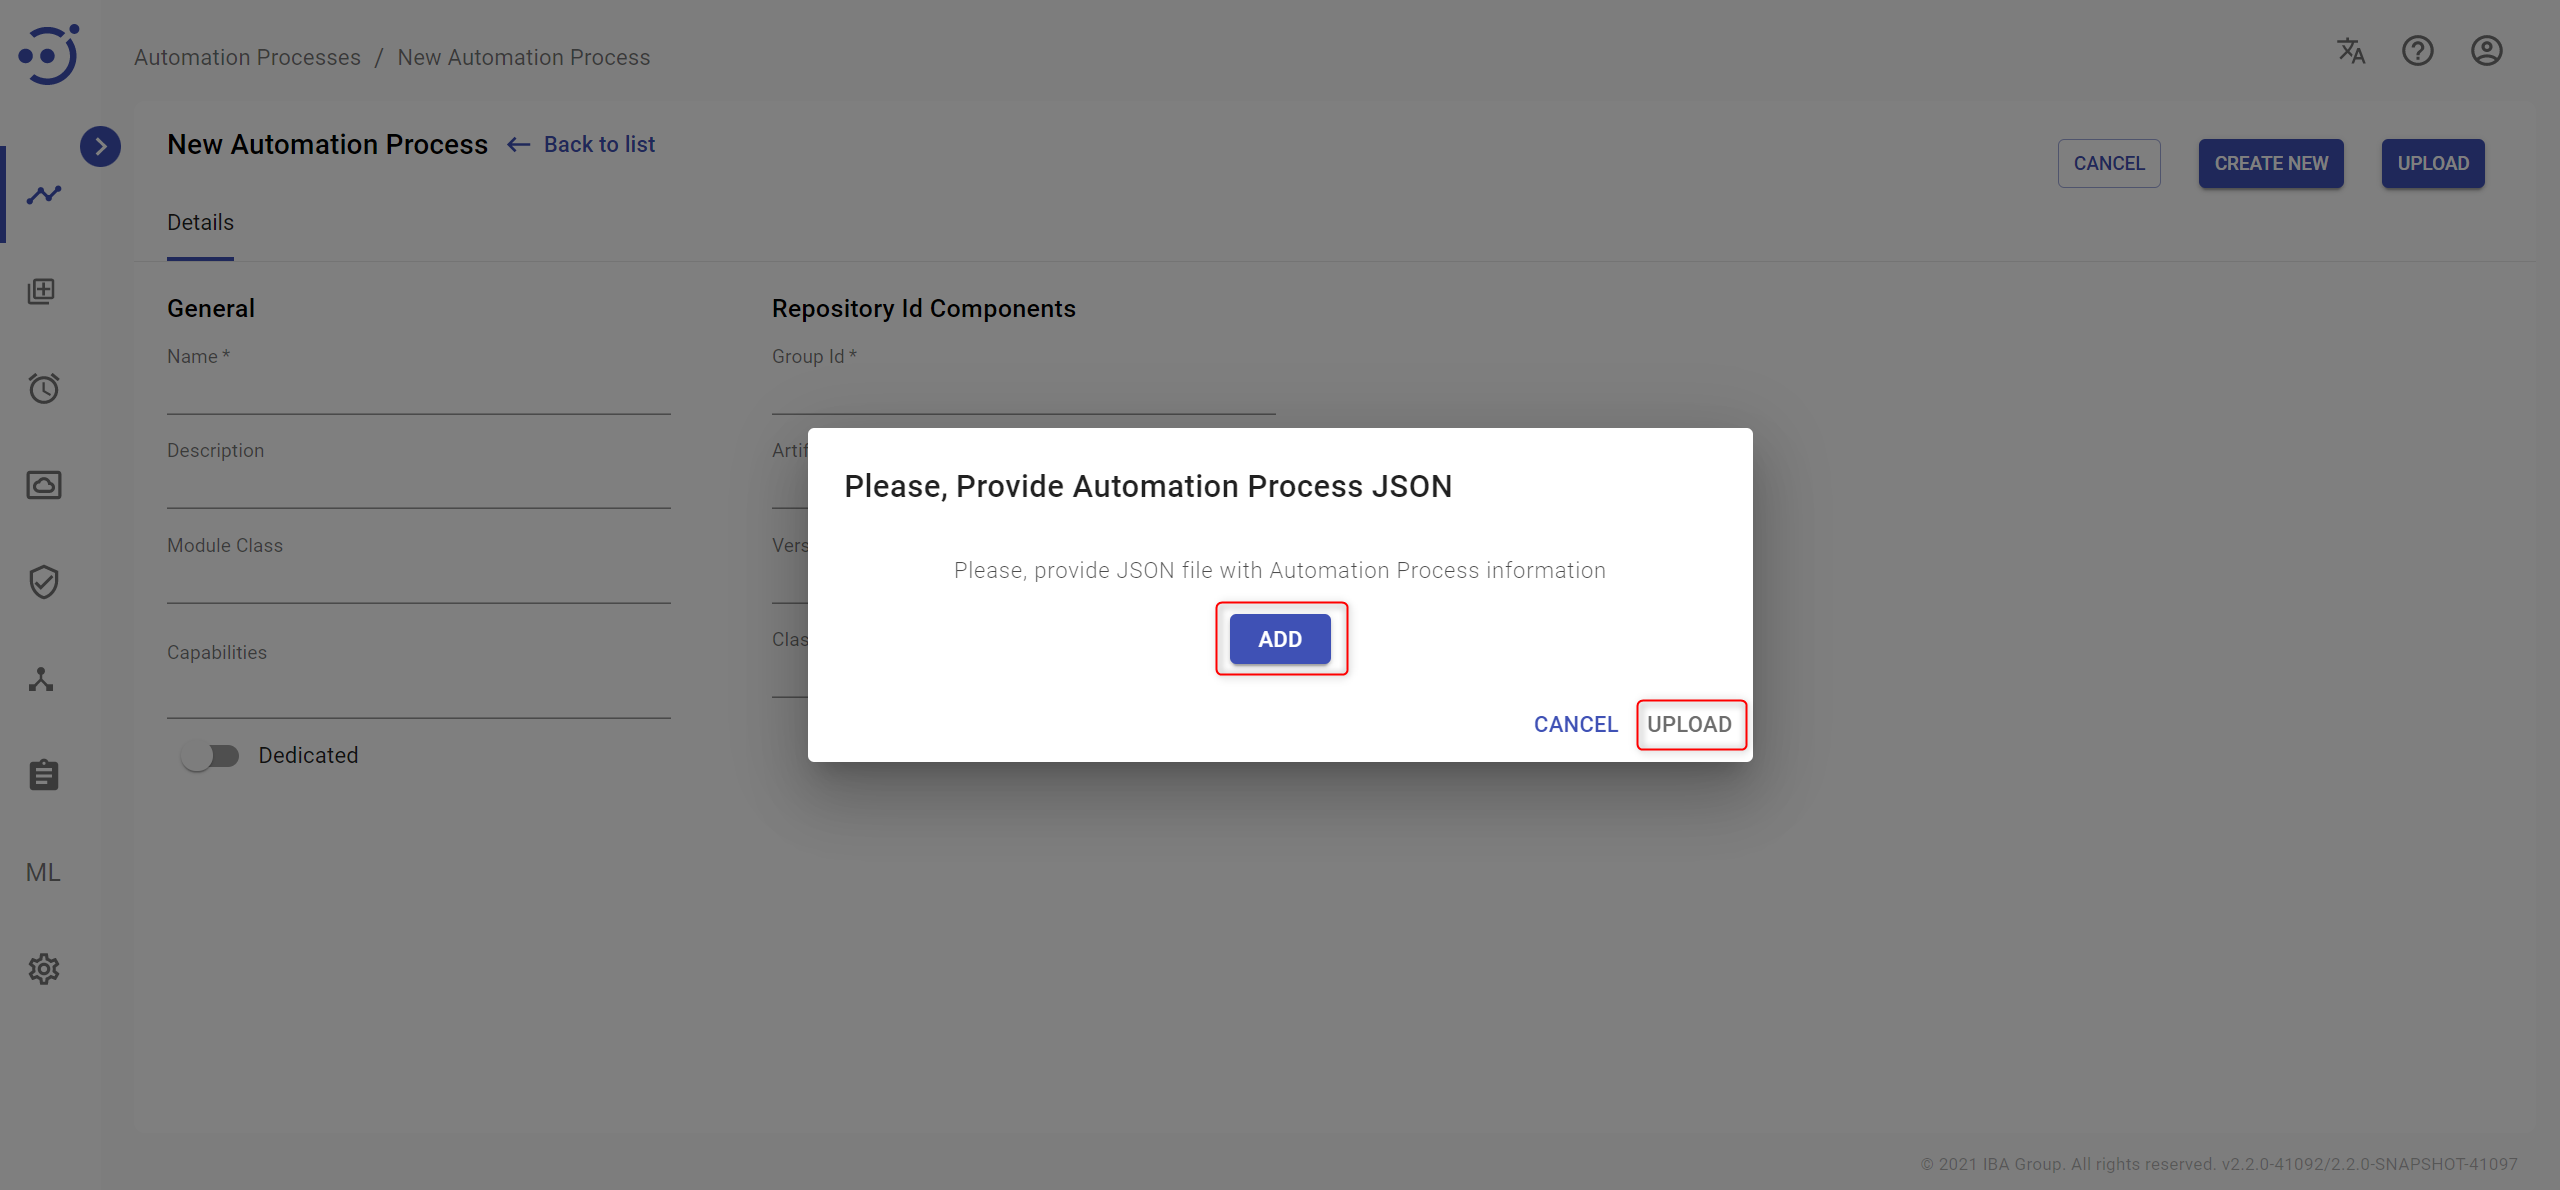
Upload Automation Process via JSON File
The other way to create the automation process is to Upload File with an automation process configuration in JSON format.
To upload a new Automation Process JSON file, you need to:
- Click Upload.
- Click Add and choose the JSON configuration file from the file system.
- Click Upload.
JSON file example:

To upload an automation process, you need to be granted AutomationProcess-CREATE permission. See Role Permissions.
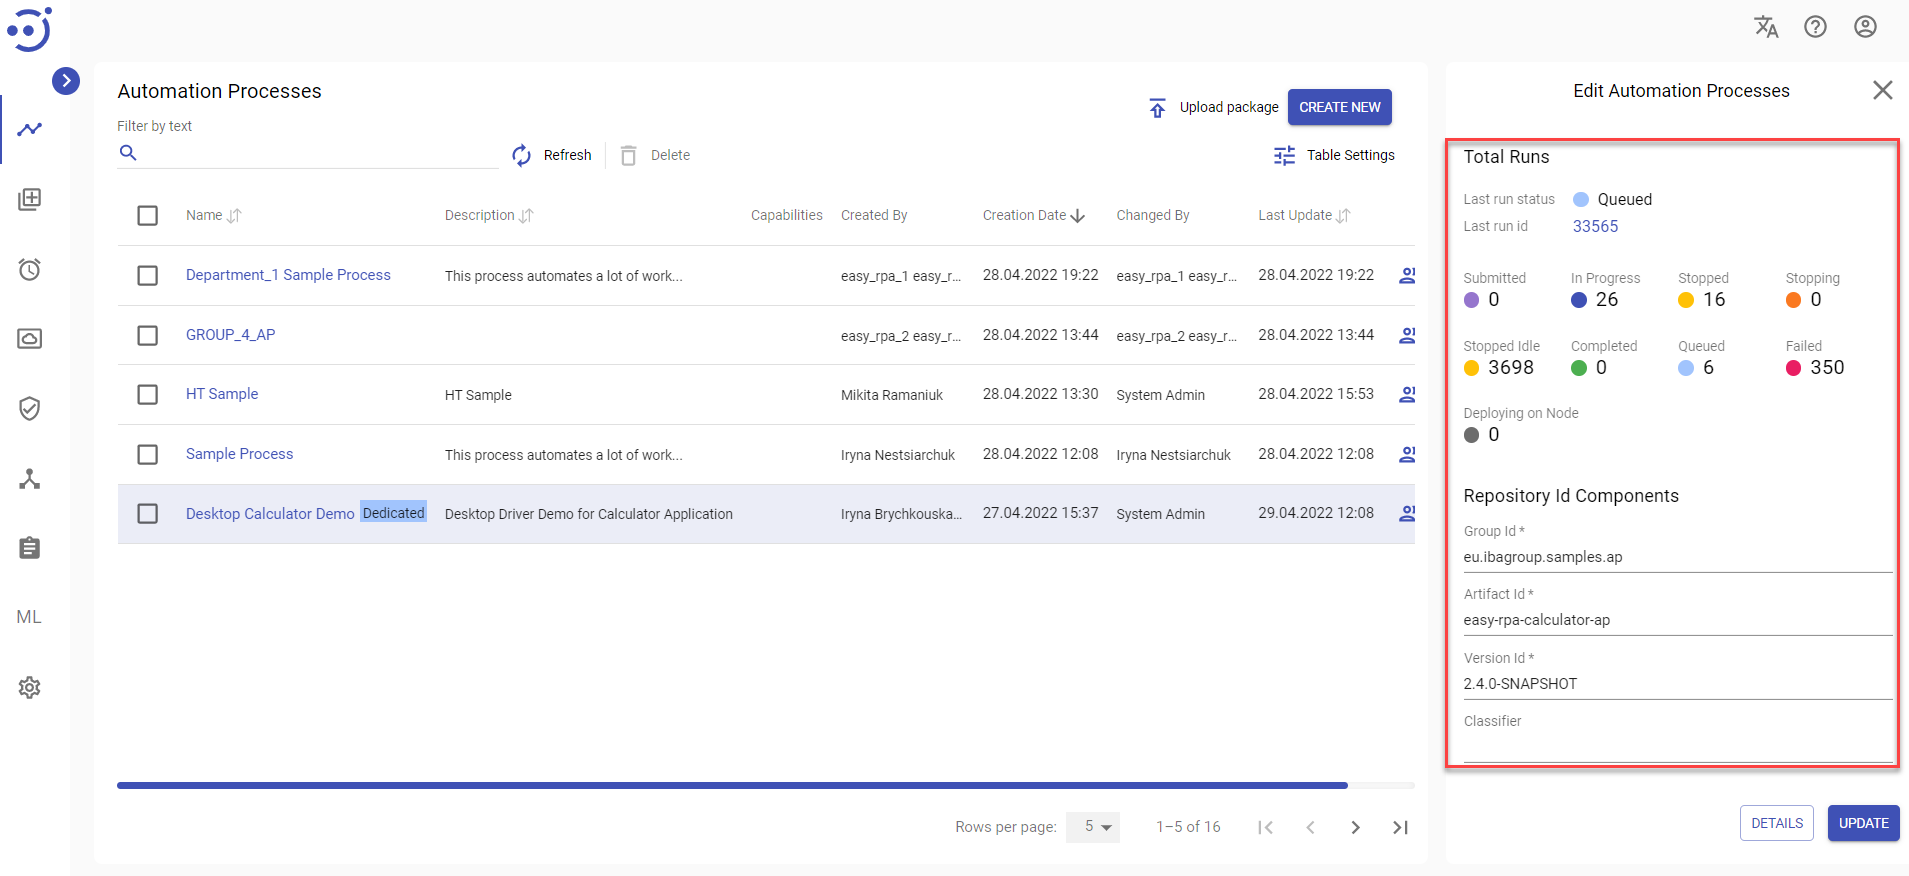
Edit Automation Process
Key information about a particular automation process is available at the pop-up panel at the right by clicking on the corresponding row with the automation process.
You can edit the displayed fields and save the result by clicking the Update button. Required Permission: AutomationProcess-UPDATE. See Role Permissions.
The pop-up panel contains the following information:
- Name - the automation process name.
- Description - a short description of the automation process functionalities.
- Module Class - the name of the module class for execution (name example: eu.ibagroup.easyrpa.demo.debtors.DebtorsAnalysisFullDemoAp)
![]() It is important to indicate module class if there are several in the package. Otherwise, the system will execute the first found module class from the package.
It is important to indicate module class if there are several in the package. Otherwise, the system will execute the first found module class from the package.
- Capabilities - the list of capability labels required for the automation process execution. You can choose available capabilities in the dropdown (the field is availble only for APs with defined capabilities).
- Dedicated Nodes (available if the Dedicated toggle is on) - the list of dedicated nodes where the dedicated automation process is ready to run.
- Dedicated - the toggle allows you to make the automation process dedicated. See Dedicated Automation Process.
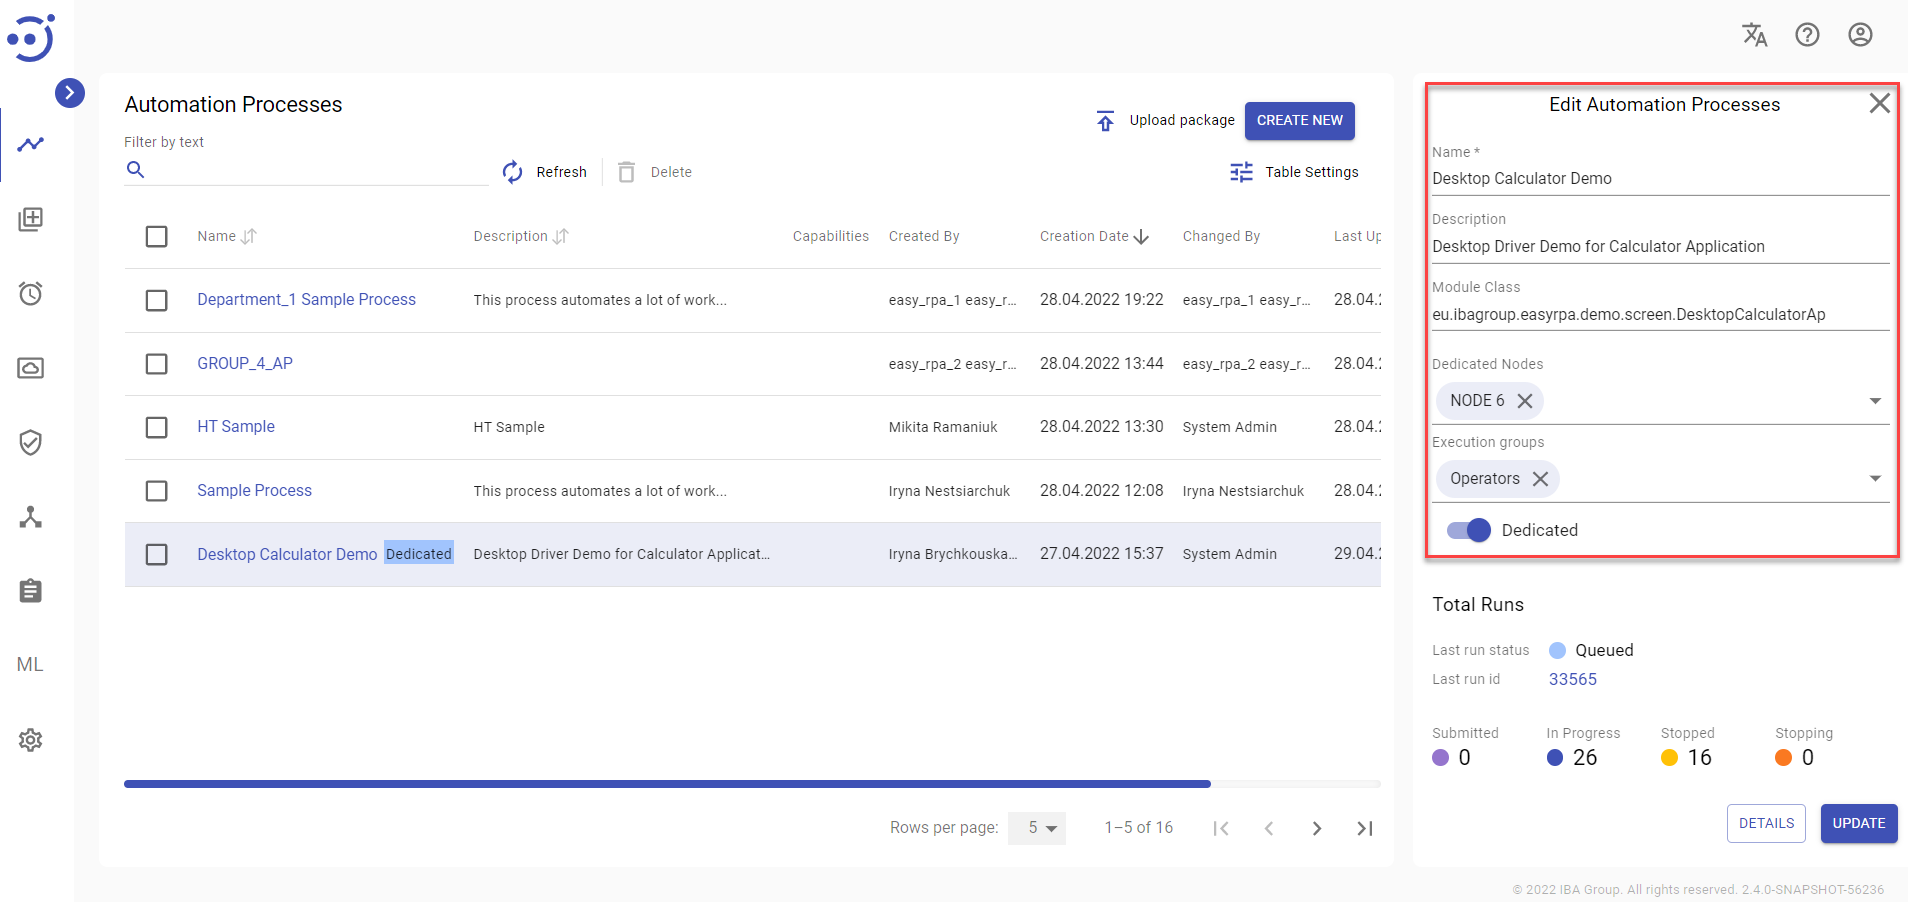
- Total Runs - the quantity of the automation process runs and their statuses. See Automation Process Run Status Lifecycle.
If the automation process was launched once, the "Last run status" is displayed - the status and the index number of the last process run. Clicking the index number of the process will lead to the last process Run page. See Automation Process Run.
- Repository Id Components - maven artifact identifier consists of the following IDs:
- Group Id (example: eu.ibagroup);
- Artifact Id (example: easy-rpa-sample);
- Version Id (example: 0.1-SNAPSHOT);
- Classifier - a unique identifier that reflects the type of resource being loaded.
![]() You can find the necessary module class and repository id values for all the available samples in the corresponding section. See RPA Samples Library.
You can find the necessary module class and repository id values for all the available samples in the corresponding section. See RPA Samples Library.
For more information about the automation process - click Details. Required Permission: AutomationProcess-READ.
Upload Automation Process Package
The EasyRPA allows to upload a package with all the necessary modules for an automation process:
- Automation process .jar file, Automation process .json definition, Automation process input and Automation process configuration parameters
- Secret vault .json file and Secret vault .json definition
- Data store and Data Store .json file definition
- Document type and Document type .json file definition
- Human Task Type and Human Task Type .json file definition
- Notification templates definitions as .json files and Notification templates as .txt files
- ML model .tar.gz file and ML model .json file definition
- Storage folder and files
For more details refer to the following article: Automation Process Project structure.
To upload a package, you need to:
- Navigate to the Automation Processes module.
- Click the Upload package icon.
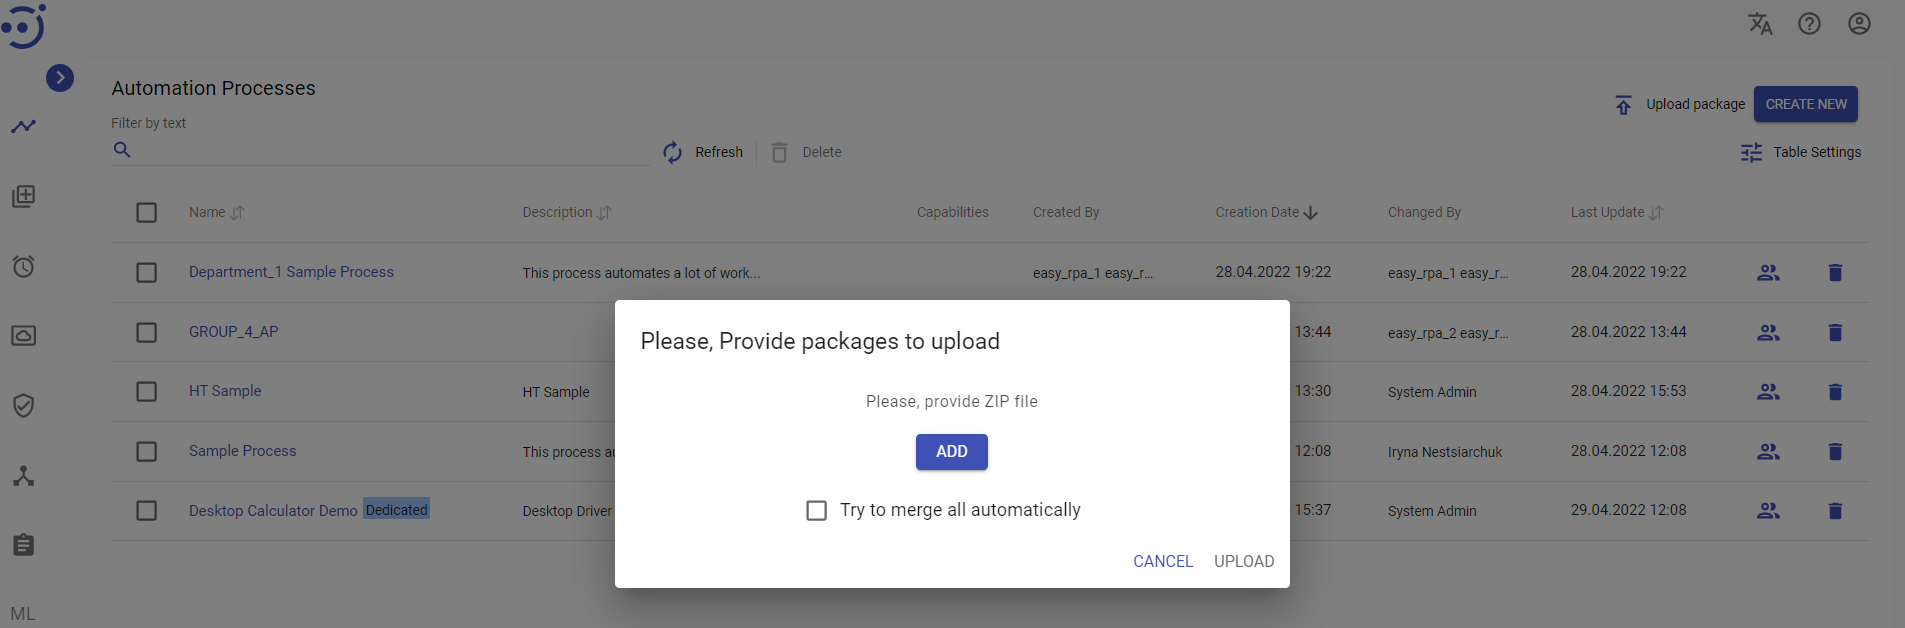
- Provide a valid .zip file with a package. To apply a defined by Automation Process developer strategy to the whole package check Try to merge all automatically.
- Click Upload.
- In case of conflicts: resolve it using options Override or Skip.

- To select the option (Import All, Skip All, Override All) for all items click on Apply strategies.
![]() If the selected option is not presented in the item, then it is not applied.
If the selected option is not presented in the item, then it is not applied.
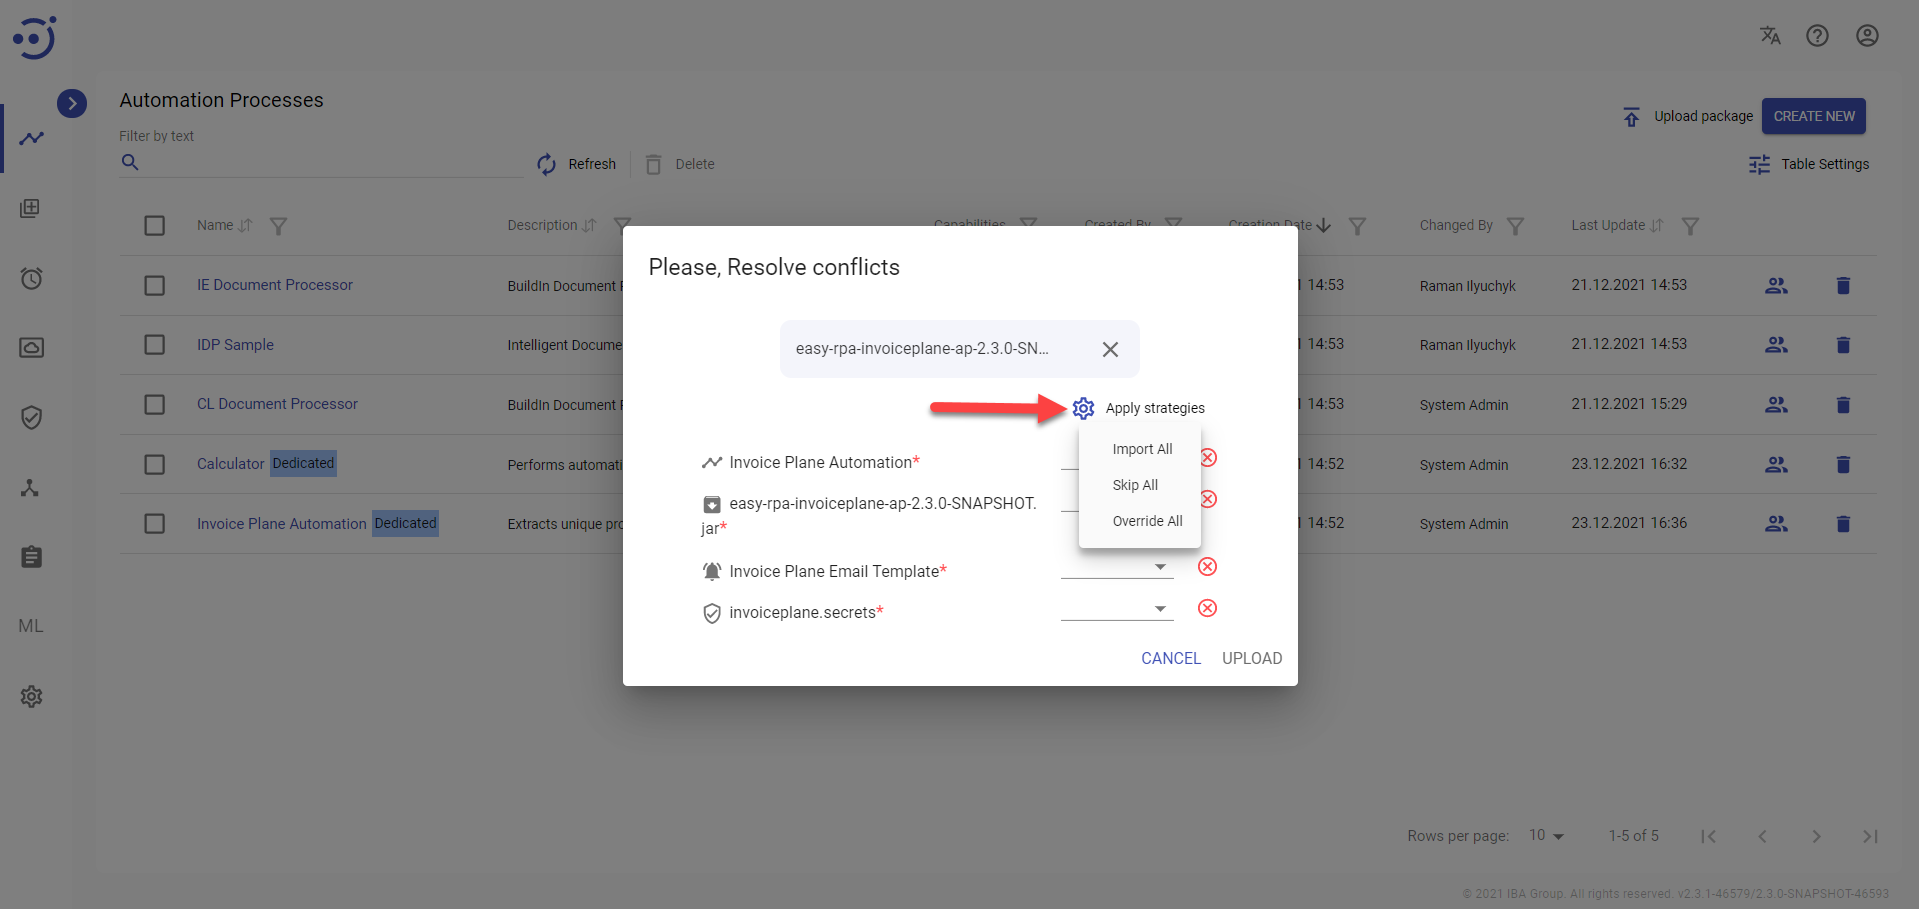
- Click Upload.
To upload a package, you need to be granted AutomationProcess-CREATE permission. See Role Permissions.