Secret Vault
Secret Vault
EasyRPA Control Server provides Secrets Vault functionality intended for storing sensitive data (i.e., login, password).
To navigate to Secret Vault module and view the list of secret vault entries, you need to be granted SecretVault-READ. To get Secret Vault details, you need to be granted SecretVault-READ permission. See Role Permissions.
Create a New Secure Entry
To create a new secret entry:
- Go to the Secret Vault module and click Create New.

2. In the New Secret Entry pop-up panel:
- Enter a unique alias to distinguish the secret entry.
- Enter a description for the entry.
- Enter value. The user can create new entries by adding sensitive data both in TEXT and JSON format.
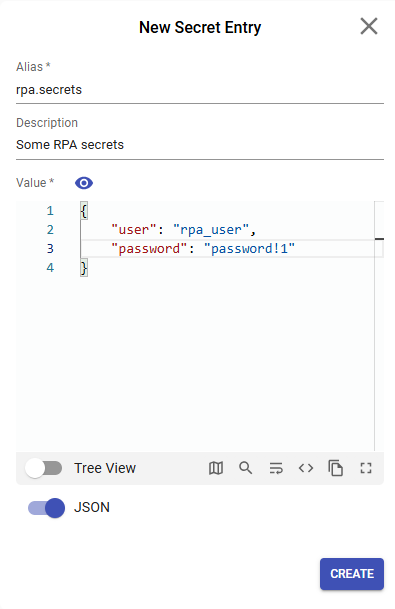
3. Click the Create button.
To create a new Secret Vault entry, you need to be granted SecretVault-CREATE permission. See Role Permissions.
Upload a New Secret Vault Entry
The other way to create the secret vault is to Upload File with secure entry in CSV format:
1. Click Upload File

2. Choose CSV format:

CSV format settings:
- DEFAULT - CSV file as a delimiter comma (,)
- SEMICOLON_SEPARATED - CSV file as a delimiter semicolon (;)
- TAB_SEPARATED - CSV file as a delimiter tab ( )
- CUSTOM - CSV file as a delimiter comma (,) other options - for advanced user.

3. Click Add to select CSV file and provide CSV file with columns: alias, value.
4. Please, use Override existing keys checkbox if needed.
5. Click Upload for load the file:

To upload a secret vault entry, you need to be granted SecretVault-CREATE permission. See Role Permissions.
View/Edit an Existing Secure Entry
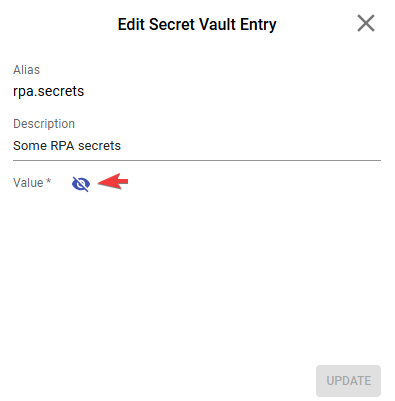
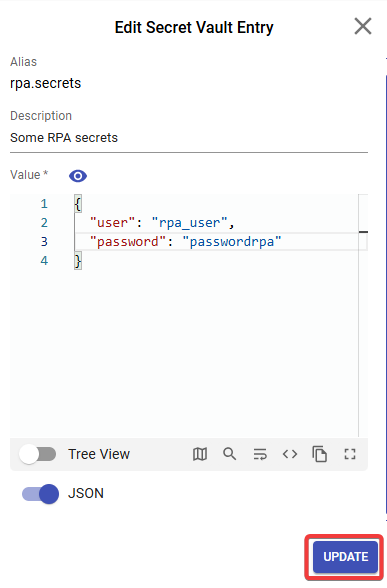
To view or edit the information about a particular secret entry, edit value field provided at the information pop-up and click the Update button.
Please, use eye icon for switch on visibility of secret entry.
![]() Once the secret vault entry created, alias cannot be modified.
Once the secret vault entry created, alias cannot be modified.
To update an existing secret vault entry you need to be granted SecretVault-UPDATE permission. See Role Permissions.
Delete an Existing Secure Entry
To delete the secret entry, use the recycle bin control icon. Required Permission: SecretVault-DELETE. See Role Permissions.
To delete multiple secret entry, you need to:
- Put a tick next to the required secret entry.
- Click Delete.

Control icons

- Refresh - to pull the last updates from the server.
- Security Access - See Security Access.
Table Settings
Table settings allow you to manage the table view. Click the icon ![]() to start working with the table settings. The table settings can be managed with the following buttons:
to start working with the table settings. The table settings can be managed with the following buttons:
- Advanced filter - to switch the advanced filters for the columns.
- Columns Display - to select the columns that will be displayed in the table.
- Apply - to apply the changes made to the table settings.
- Сancel - to cancel the last actions with the table settings.
Filter by text
Filtering allows you to search the Secret Vault by Alias column.
Advanced filters by column
Advanced Filter allows you to extract a list from a table with predefined criteria. Click the icon ![]() to start working with the advanced filter. The advanced filters can be managed with the following buttons:
to start working with the advanced filter. The advanced filters can be managed with the following buttons:
- Clear filter - to reset all the proposed advanced filter criteria for the column.
- Сancel - to cancel the last actions with the proposed criteria for the column.
Apply - to filter the table according to the proposed criteria for the column.
Sorting
Ascending/descending sorting is allowed for Alias, Creation Date, Last Update columns.