User Management
User Management
The User Management module displays a catalog of all the users in the system and provides access to all User Management functions. The Lightweight Directory Access Protocol, or LDAP for short, is used for easy management user accounts. All users are accessed from your external LDAP resource after adding users to EasyRPA and assigning user group with roles.
You can access the module by clicking Administration → User Management. Required Permission: User-READ and Administration-READ. See Role Permissions.

EasyRPA Control Server allows to perform the following actions:
- Create a new user via CREATE NEW icon above the table.
- Edit user properties and user groups via Edit User popup panel.
- Delete an existing user via the recycle bin control icon in the table row or Delete icon above the table.
- Restore a deleted user via Restore icon in the table row.
Table Settings
Table settings allow you to manage the table view. Click the icon ![]() to start working with the table settings. The table settings can be managed with the following buttons:
to start working with the table settings. The table settings can be managed with the following buttons:
- Advanced filter - to switch the advanced filters for the columns.
- Columns Display - to select the columns that will be displayed in the table.
- Apply - to apply the changes made to the table settings.
- Сancel - to cancel the last actions with the table settings.
Filter by text
Filtering allows you to search the user by the columns: Username, E-mail, Full Name, Status, Groups.
Advanced filters by columns
Advanced Filter allows you to extract a list from a table with predefined criteria. Click the icon ![]() to start working with the advanced filter. The advanced filters can be managed with the following buttons:
to start working with the advanced filter. The advanced filters can be managed with the following buttons:
- Clear filter - to reset all the proposed advanced filter criteria for the column.
- Сancel - to cancel the last actions with the proposed criteria for the column.
Apply - to filter the table according to the proposed criteria for the column.
Sorting
Ascending/descending sorting is allowed for the columns: Username, E-mail, Full Name, Creation Date.
Grouping
Grouping is allowed for the Status column.
Control Icons
- Restore - to restore the user via the control icon in the table row or above the table. Required Permissions: User-UPDATE. See Role Permissions.
- Security Access - to manage a group for a specific user. Required Permission: Group-READ. See Role Permissions.
Delete - to delete the user via the recycle bin control icon in the table row or Delete icon above the table. Required Permissions: User-DELETE. See Role Permissions.
- Refresh - to refresh the page.

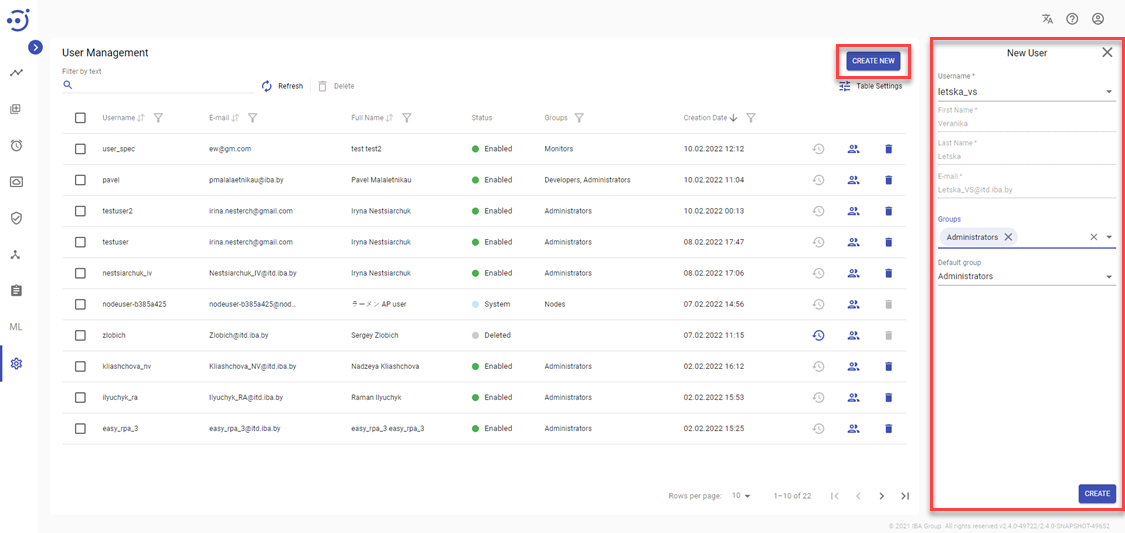
Create a New User
To create a user:
- Go to the User Management module and click CREATE NEW. Required Permission: User-CREATE. See Role Permissions .
- In the New User popup panel:
- Enter Username, First Name and Last Name, Password, Confirm Password, E-mail. If LDAP is enabled: Enter at least 3 letters of Username and choose user from available in the dropdown list. The user credentials cannot be changed since it is provided from your external LDAP resource.
- Choose the user Groups from available in the dropdown list. To add a new User Group, go to Administration → Group Management.
- The default group contains permissions and is selected automatically when you choose a group.
3. Click CREATE.
Password
Password requirements:
- Password should not contain the username.
- Password should be 8-64 characters long.
- Password should contain at least one uppercase letter (A-Z), one lowercase (a-z) and one number (0-9).
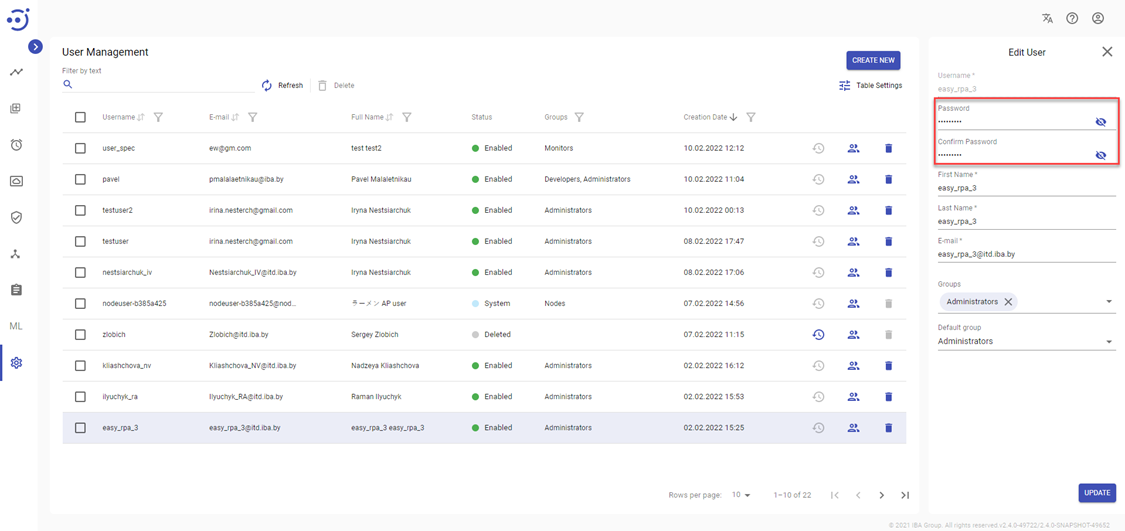
Change password:
There are two ways to change user passwords.
1. User that belongs to the "Administrators" group clicks the corresponding user row, changes the password in the popup panel, and clicks UPDATE. Required Permissions: User-UPDATE. See Role Permissions.
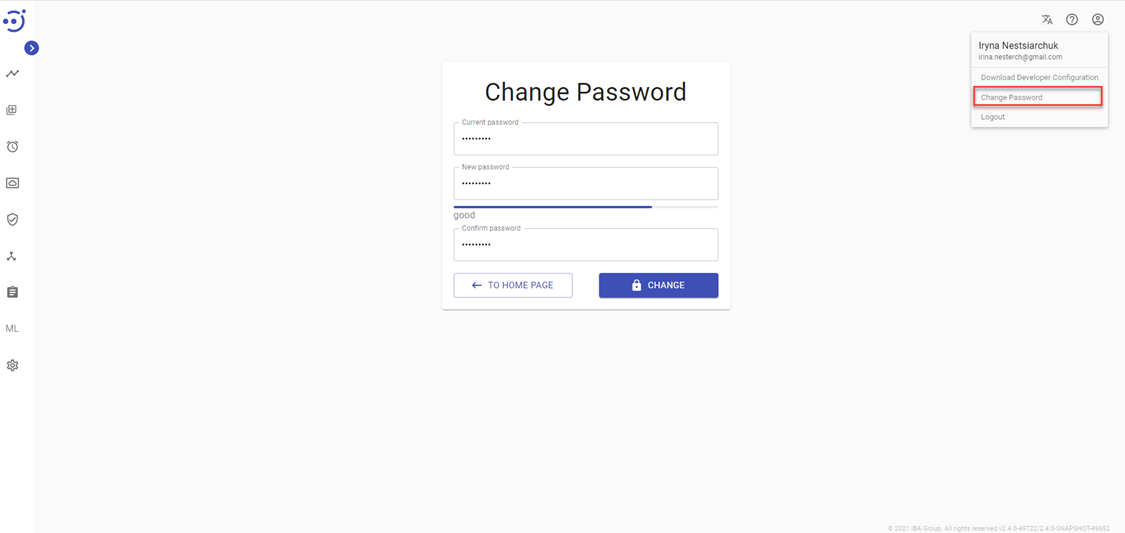
2. User clicks on the profile icon in the upper-right corner and selects "Change Password" row, fills in the specified fields: Current password, New password, Confirm password according to the password requirements and clicks CHANGE.
![]() Password can be changed only if the LDAP is disabled.
Password can be changed only if the LDAP is disabled.
System User
The User Management module displays the system users, who are necessary for the correct operation of the application. They can be created automatically (QUEUE, SCHEDULER) or manually, when creating a user (NODEUSER). System Users have the "System" status.
![]() System users cannot be edited or deleted.
System users cannot be edited or deleted.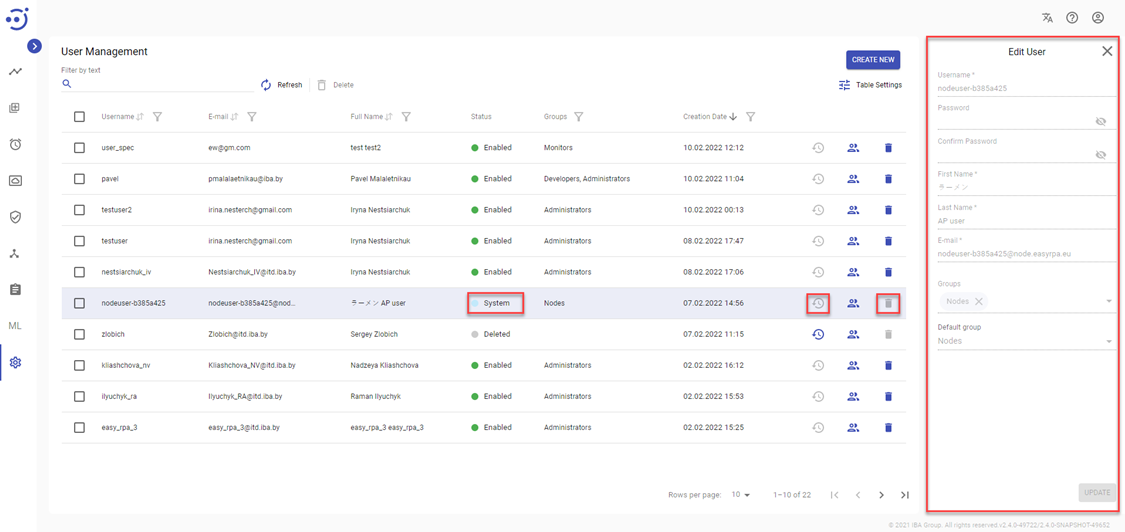
View/Edit a User Properties
To view or edit user information, click the corresponding user row, make changes in the popup panel, and click UPDATE. Required Permissions: Required Permissions: User-UPDATE. See Role Permissions.
If LDAP is enabled, Username, First Name, Last Name, E-mail, Password cannot be changed.

Delete/Restore User
To Delete user, use the recycle bin control icon in the table row or Delete icon above the table. Required Permissions: User-DELETE. See Role Permissions.

![]() Deleted users cannot log in to Control Server until they are restored.
Deleted users cannot log in to Control Server until they are restored.
Download Developer Configuration of a User
To Download Developer Configuration of a user, click on the profile icon in the upper-right corner and select "Download Developer Сonfiguration" row:

![]() Download Developer Configuration row is available only for a user who belongs to a group with Development-READ permission. See Role Permissions.
Download Developer Configuration row is available only for a user who belongs to a group with Development-READ permission. See Role Permissions.
User Groups and Role Permissions
Each Control Server user may have one or more groups in the system. To view or modify a User membership in Groups, go to Administration → Group Management → Users or open Edit User popup panel.
You can create a new Role with a custom set of Permissions and grant it to a user via Group membership. To view or modify Permissions for a User Role, go to Administration → Group Management → Roles.
User Maintainability Matrix
Depending on the Control Server authentication/authorization mode selected, the following user maintainability logic applies:
|
|---|