Text Cleaning
Text Cleaning
Cleaning a text image for OCR is the process of applying preprocessing techniques to enhance the image and remove unwanted elements that may negatively impact text recognition results.
General Approach to Text Cleaning
The general approach to cleaning a text image for OCR using ImageMagick can involve a combination of preprocessing steps to enhance the image quality and optimize it for accurate text extraction.
Here are some common steps involved in cleaning a text image for OCR:
- Image resizing and scaling: adjusting the image size and resolution to an optimal level for OCR processing, considering factors like text size, OCR engine requirements, and computational efficiency.
- Noise reduction: applying filters or algorithms to reduce noise, such as speckles or random pixels, that can interfere with text recognition.
- Contrast enhancement: adjusting the image's contrast and brightness to enhance the visibility and differentiation of text from the background.
- Binarization: converting the image to a binary format by thresholding, separating the text from the background. This step ensures clearer distinction and simplification of the text for OCR processing.
- Deskewing: correcting any skew or slant in the image caused by scanning or image capture, ensuring the text is horizontally aligned for accurate recognition.
- Removal of unwanted elements: eliminating any unnecessary artifacts, such as borders, lines, or stray marks, that are not part of the actual text content but can affect OCR accuracy.
Text Cleaning with ImageMagick Options
Here is an example of a color scan of a document and the result of the image preprocessing with ImageMagick used to enhance the image for better OCR:
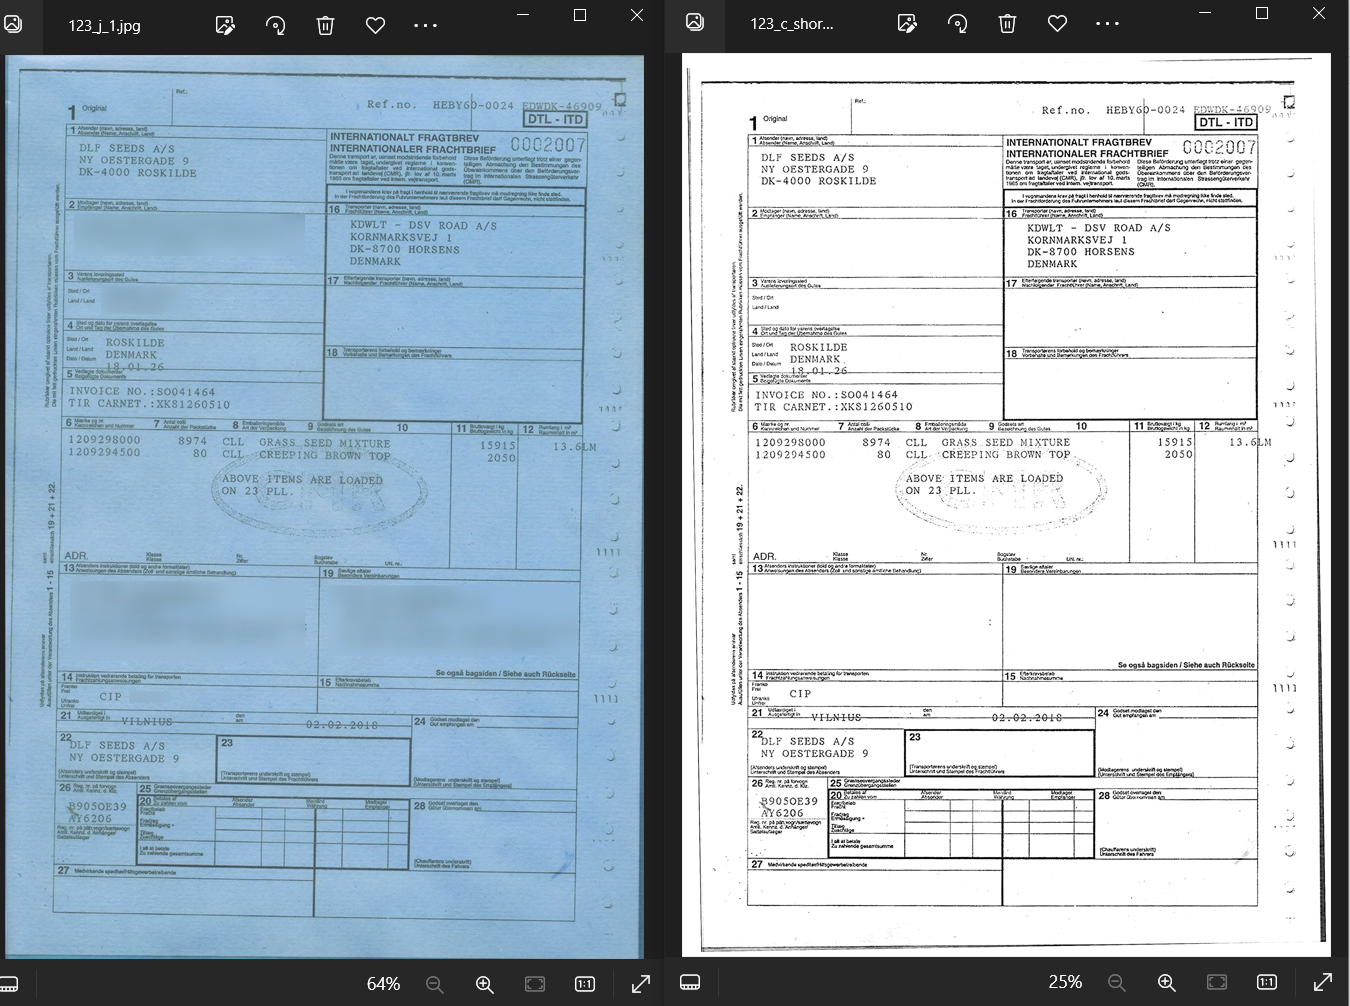
The input image quality and potential difficulties for OCR:
- Low resolution 120 dpi,
- Small text size - capital letters 11px,
- Color image with low contrast,
- Textured background (noise),
- Uneven lighting and shadows.
To produce a clean image suitable for OCR and remove the issues mentioned above the following ImageMagick settings were used for image preprocessing:
Explanation of the image preprocessing approach:
- "-units PixelsPerInch": Sets the units for resolution to Pixels Per Inch (PPI).
- "-resample 200": Resamples the image to a resolution of 200 PPI. This changes the number of pixels in the image without altering its physical size.
- "-density 200": Sets the resolution of the image to 200 dots per inch (DPI).
- "-colorspace gray": Converts the image to grayscale color space, removing color information and representing the image in shades of gray.
- "-type grayscale": Specifies that the image should be interpreted as grayscale. This ensures consistent handling of the grayscale color space.
- "-normalize": Normalizes the intensity values of the image, stretching the range to enhance contrast and improve legibility.
- "-deskew 40%": Attempts to deskew the image by automatically straightening any slanted or skewed text by 40%.
- "-unsharp 0x3": Applies an unsharp mask filter to enhance the sharpness of edges and details in the image.
- "-modulate 160,0,100": Modulates the brightness, saturation, and hue of the image. Here, it increases the brightness (160) while keeping saturation and hue unchanged. Increasing brightness can help enhance the visibility of the text, especially if the original image is dim and has low contrast. It can make the text stand out more prominently from the background. Setting the saturation to 0 means completely desaturating the image, keeping it to grayscale.
- "-trim +repage": Trims unnecessary borders or whitespace around the image after “-deskew” operation and resets the image's virtual canvas page.
- "-bordercolor white -border 20": Adds a white border with a width of 20 pixels around the image.
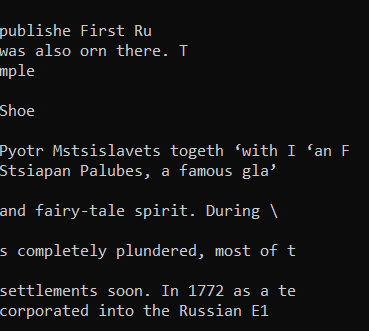
OCR result:
This approach can be used in many other cases and it is suitable for preprocessing images with similar issues. It might be necessary to make adjustments to such options as: -resample, -density, -modulate and -unsharp.
Textcleaner script
Textcleaner script overview
"Textcleaner" script is designed to optimize scanned documents by refining the text and eliminating any unwanted background elements. It utilizes ImageMagick and offers a set of processing steps that are specifically created to enhance the quality and legibility of scanned documents. By applying a combination of techniques such as density adjustment, rotation, cropping, grayscale conversion, enhancement, background cleaning, text smoothing, sharpening, and other optional adjustments, it produces refined and clear text images as an output result. It is flexible and allows optional adjustments of parameters based on specific requirements.
Within EasyRPA platform, the "textcleaner" script is seamlessly integrated into the image preprocessing pipeline. It can be called after ImageMagick options before performing OCR.
To apply the "textcleaner" script on a document image:
- provide the relevant settings in JSON format in the Document Set Details.
- initiate the Preprocess action of an IE Document Processor.
Textcleaner script options
Here are the optional parameters available in "textcleaner" for additional customization and control over the cleaning process:
-r rotate image 90 degrees in direction specified if aspect ratio does not match layout; options are cw (or clockwise), ccw (or counterclockwise) and n (or none); default=none or no rotation
-l desired layout; options are p (or portrait) or l (or landscape); default=portrait
-c image cropping offsets after potential rotate 90; choices: one, two or four non-negative integer comma separated values; one value will crop all around; two values will crop at left/right,top/bottom; four values will crop left, top, right, bottom
-g convert document to grayscale before enhancing
-e enhance image brightness before cleaning; choices are: none, stretch or normalize; default=none
-f size of filter used to clean background; integer>0; default=15
-o offset of filter in percent used to reduce noise; integer>=0; default=5
-u unrotate image; cannot unrotate more than about 5 degrees
-P preserve input size after unrotate
-t text smoothing threshold; 0<=threshold<=100; nominal value is about 50; default is no smoothing
-s sharpening amount in pixels; float>=0; nominal about 1; default=0
-S color saturation expressed as percent; integer>=0; only applicable if -g not set; a value of 100 is no change; default=200 (double saturation)
-a alternate text smoothing using adaptive blur; floats>=0; default=0 (no smoothing)
-T trim background around outer part of image
-p border pad amount around outer part of image; integer>=0; default=0
-b desired color for background or "image"; default=white
-F fuzz value for determining bgcolor when bgcolor=image; integer>=0; default=10
-i invert colors; choices are: 1 or 2 for one-way or two-ways (input or input and output); default is no inversion
-C TIFF output compression mode; choices are: none (n), lzw(l), zip(z), fax(f), and group4(g); default=none
-D input density when reading single page vector (PDF) files; integer>0; default is no input density
-R resize after reading a single page vector when supersampling to rasterize; 0<=integer<100 (percent); default is no resize
Recommended settings for textcleaner script
Below you can find an example of JSON settings for "textcleaner" script.
Here is an example of a document image, showcasing the effects of applying the "textcleaner" script with the settings provided above:
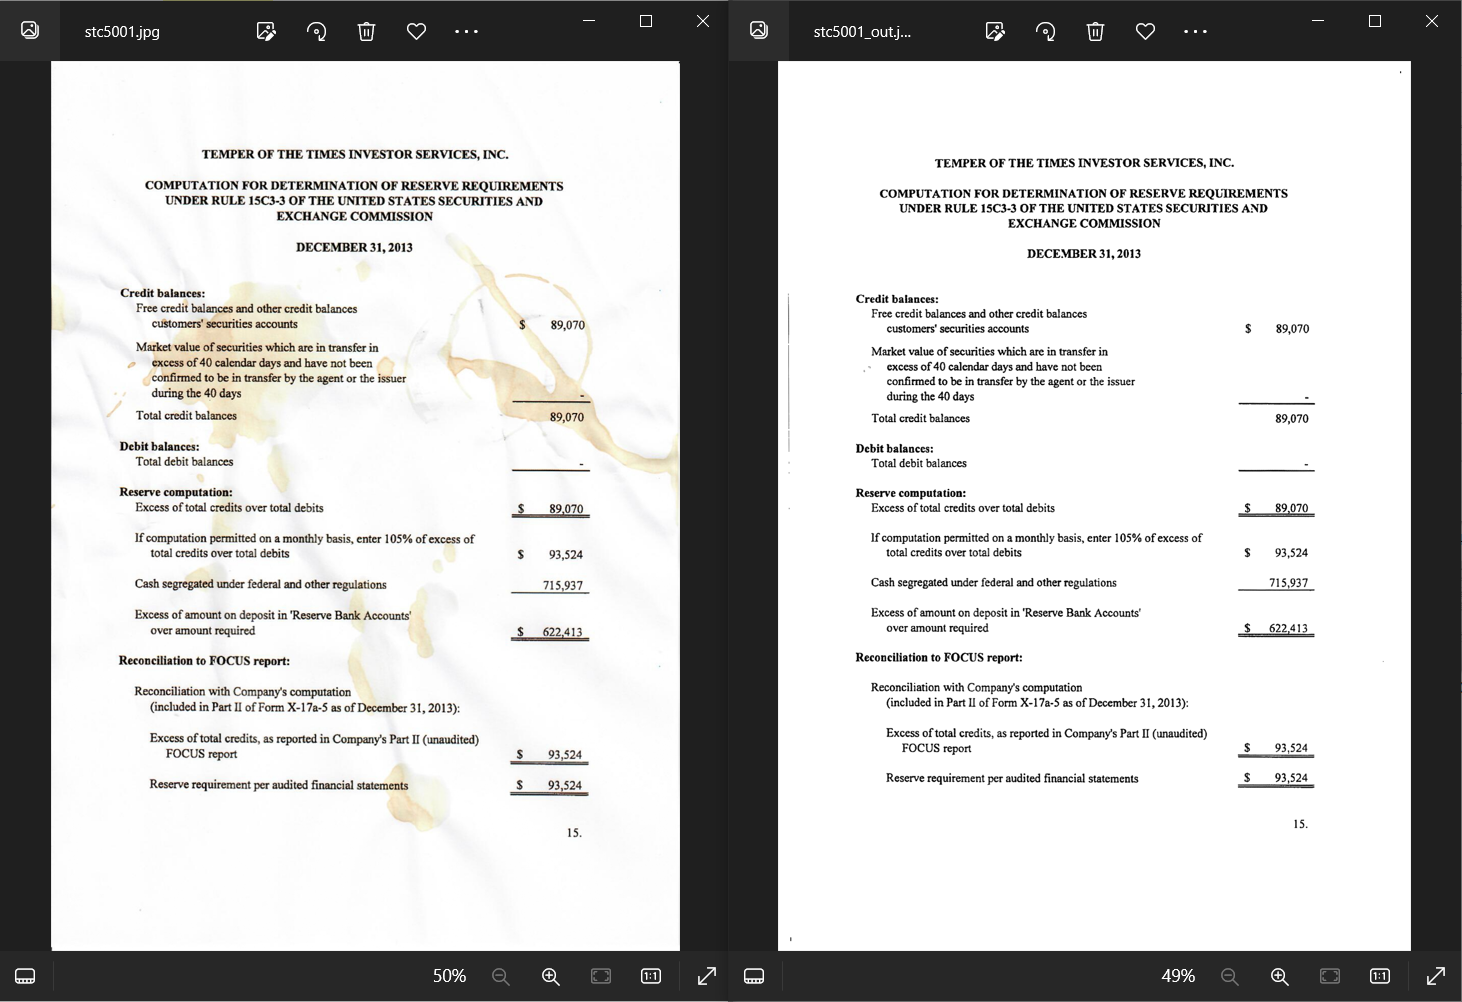
To change the amount of detail in the output image you can tweak the "-f" and "-o" parameters. To increase the amount of detail in the image you should decrease the values for "-f" and "-o".
To test and play with "texcleaner" script, download Optical Character Recognition Sample Process (OCR Sample).
To find out about other ImageMagick scripts, see OCR Analysis and Built-in OCR.
Additional ImageMagick Options for Text Cleaning
Noise Reduction with -despeckle and -enhance
In ImageMagick, the "-enhance" and "-despeckle" options are the image enhancement techniques, that can be used in different scenarios when preparing text images for OCR:
- The "-enhance" option is used to improve the overall appearance and quality of the image. It applies a combination of contrast enhancement, sharpening, and noise reduction techniques to enhance the details and make the image visually more appealing. It can help to bring out the fine details of the text and improve its readability.
- The "-despeckle" option is specifically designed to reduce speckle noise in an image. Speckle noise often appears as small, random variations in brightness or color, resembling grain or dots. It is common in scanned documents or images obtained through low-quality capture methods.
In the example below we have applied the ImageMagick options recommended in the previous section which aim to improve the image quality, adjust the contrast, remove skew, sharpen the image, and add a border for visual purposes. The output image is of acceptable quality and produces a decent OCR result with few errors. However, there are some OCR errors and it can be easily observed that the output image still contains speckle noise:
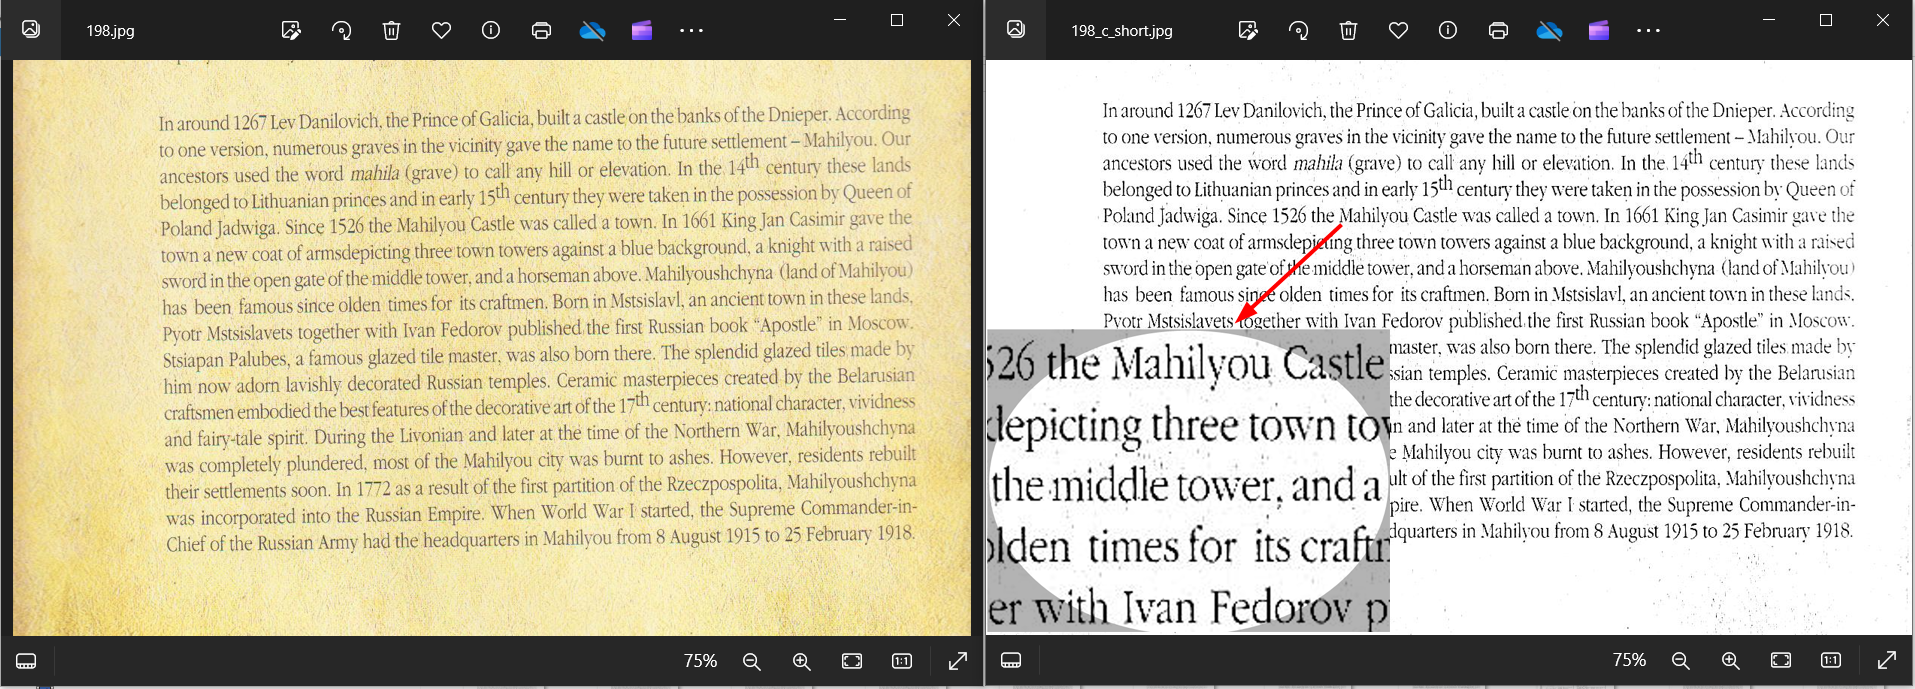
We have added the "-enhance" or "-despeckle" to ImageMagick options preprocessed the image again. This technique allowed us to improve the OCR result and get rid of the errors.

The OCR result of the initial image before we applied image preprocessing looked like this:
The full ImageMagick settings that we used to preprocess the text image:
In some cases several "-despeckle" or "-enhance" iterations might be required to achieve the desired effect of noise removal and image enhancement.
It is possible to write a sequence of "-despeckle" or "-enhance" operations in the ImageMagick settings. In this case the image will have several noise reduction passes in one run, each one of them improving the result of the previous. For example:
Here is an example of output images after 1 and multiple -despeckle operations: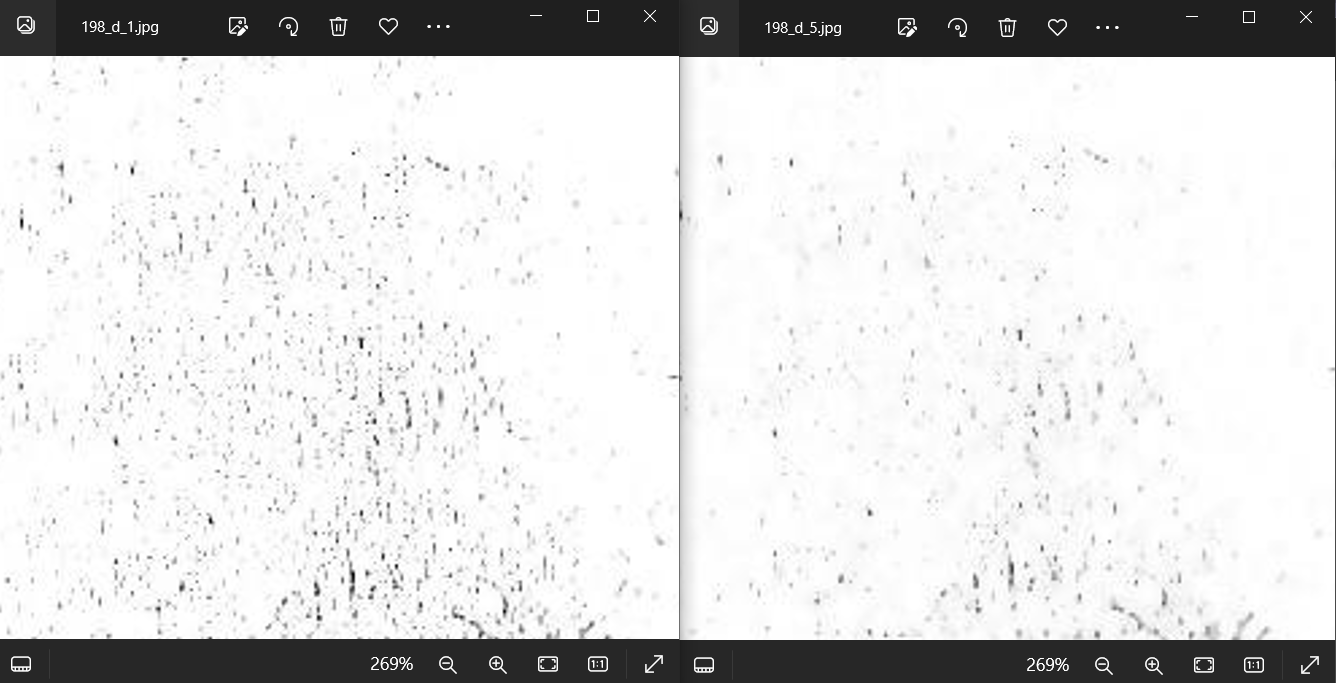
However, applying multiple "-despeckle" operations in a preprocessing run can potentially worsen the text quality and introduce gaps into letters. While the despeckle operation aims to reduce speckle noise and smooth out small-scale variations in brightness or color, applying it excessively can lead to loss of text features. It's generally recommended to use a moderate number of "-despeckle" iterations and carefully assess the impact on text quality and OCR accuracy.
Black Spots Removal with -morphology
In binary scanned documents, the presence of scattered black spots and noise on a white background can decrease Tesseract OCR accuracy. This typically shows up when Tesseract complains that there are “lots of diacritics” when it searches for letters. The noise and black spots can interfere with character recognition, lead to misinterpretation and finally create difficulties for model training.
Grayscale scans are easier to clean. If it is possible to use grayscale image version it should be used for cleaning. When the image has already been thresholded to black and white image processing techniques such as “-despeckle” are unlikely to help. However, ImageMagick offers "-morphology" operations which can be employed in such cases to reduce scattered black spots and noise and enhance the text for better OCR.
In this example the "-morphology Dilate Square:1" option in ImageMagick can help address the issue. It applies a morphological operation of dilation to the image and uses a structuring element, in this case, a square of size 1 pixel.
Dilation expands the white regions and helps to fill in small black spots or gaps, thereby reducing the impact of noise and improving the overall quality of the text.
This operation can be applied carefully as it can potentially cause negative effect on the text. While expanding white areas it may also affect other elements present in the document, such as lines, borders, or text elements, which can further impact the visual quality and readability of the document for OCR.
In our case, this operation is suitable since the letters in our text are 10 pixels wide which is too thick for OCR. According to Tesseract documentation bold thick caracters can "impact the recognition of details and reduce recognition accuracy".
The dilation operation not only removes the unwanted black spots but also thins the characters which only increases the readability of the text in the example below.
The image before "-morphology Dilate" (black spots are misinterpreted as characters in binary images by Tesseract OCR engine):
The image after "-morphology Dilate":
Noise and Image Format
JPEG is a lossy format. JPEG images almost always have noise around text. The noise around text in JPEG images is mostly compression artifacts, as JPEG compression process can introduce subtle variations in pixel values, resulting in noise-like patterns around text regions.
TIFF and PNG formats, being lossless image formats, do not introduce compression artifacts like JPEG. Therefore, TIFF and PNG images are generally considered to have better image quality and lower noise compared to JPEG images, especially when it comes to preserving details and text clarity. However, noise can still be present in TIFF or PNG images if it was present in the source or if it resulted from image scanning. In general, TIFF and PNG formats are considered better choices for OCR compared to JPEG.
Example of JPG and PNG images, JPG (1) image has more noise around characters:

Resources:
ImageMagick command line options:
https://imagemagick.org/script/command-line-options.php
ImageMagick morphology operations:
http://www.fmwconcepts.com/imagemagick/textcleaner/index.php
Textcleaner script: