Evaluating and Enhancing Image Quality for OCR
Evaluating and Enhancing Image Quality for OCR
Evaluate Image Quality for OCR Task
Optimizing OCR results through image preprocessing is a complex task that depends on a number of factors. These factors have to be evaluated to determine the suitability of the source image for accurate OCR. Be careful when choosing image preprocessing techniques. Not every document should undergo numerous preprocessing operations. A heavy image cleanup process can take a long time, potentially distort the letters and lead to loss of detail. Follow the ‘less is more’ principle when planning on document image preprocessing since minimizing unnecessary modifications can often lead to better results.
Consider the following factors before deciding on the need for image preprocessing:
Image resolution
The image should have a sufficiently high resolution to capture the details of the text clearly. According to Tesseract official documentation images should have at least 300 dpi to get accurate OCR results. However, it's important to note that this factor should be considered in conjunction with another significant factor: the size of the text being recognized.
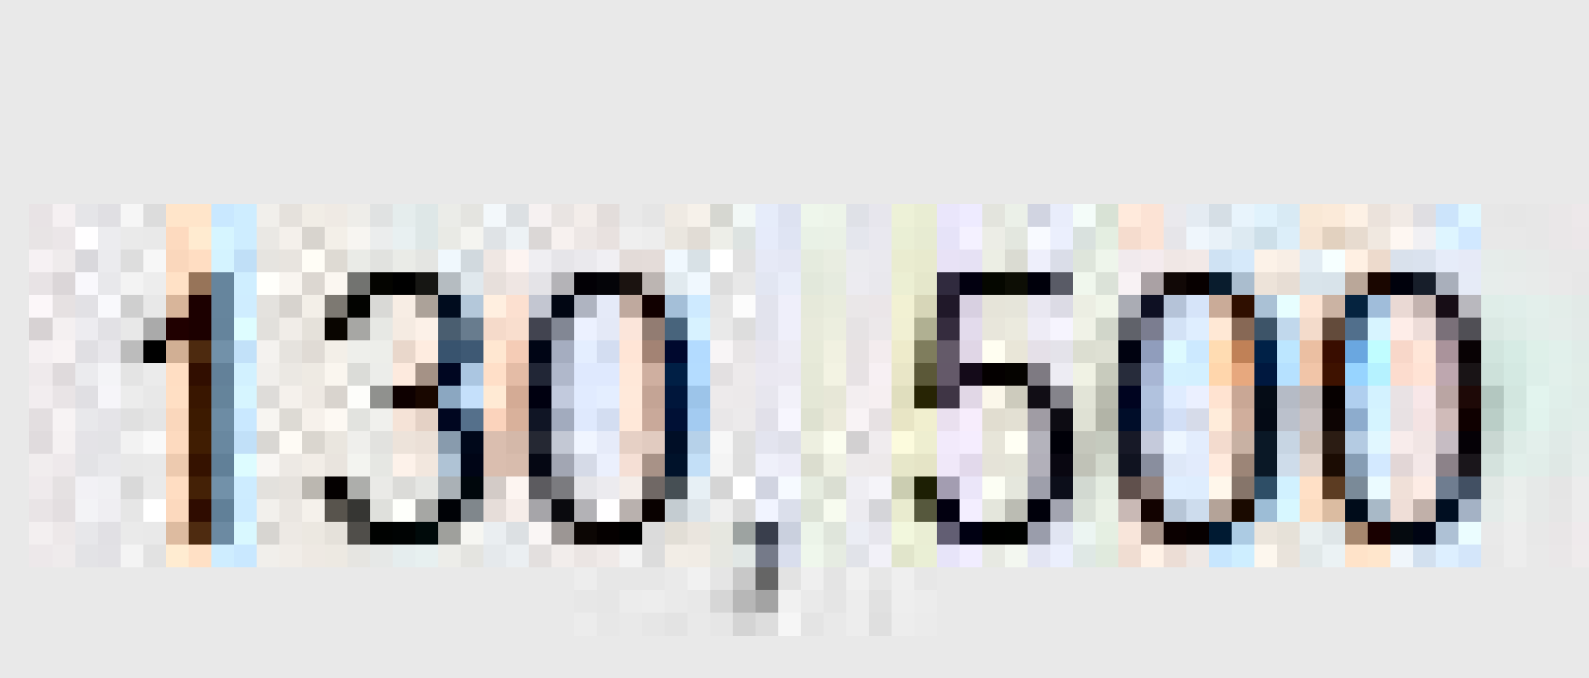
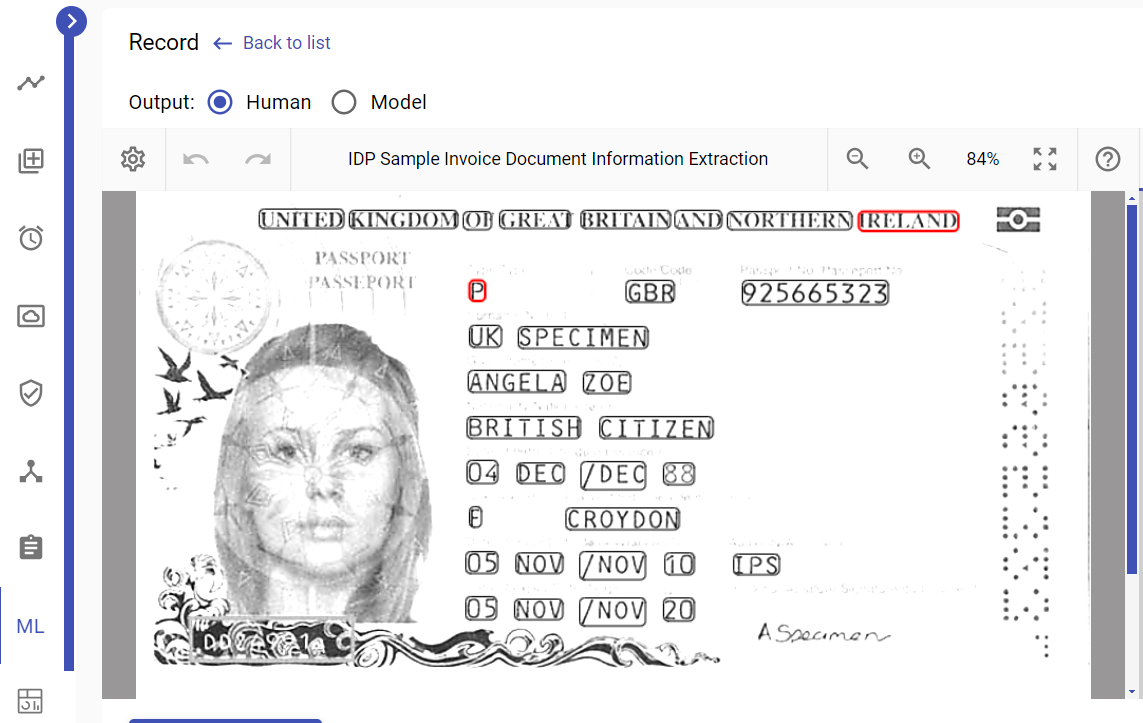
Low resolution image.
Text size
You should also consider text size which depends not only on the image resolution but also on point size. If the text size is too small in relation to the image resolution, Tesseract may struggle to accurately recognize and interpret the text.
Here is an explanation from the official Tesseract documentation : "There is a minimum text size for reasonable accuracy. You have to consider resolution as well as point size. Accuracy drops off below 10pt x 300dpi, rapidly below 8pt x 300dpi. A quick check is to count the pixels of the x-height of your characters. (X-height is the height of the lower case x.) At 10pt x 300dpi x-heights are typically about 20 pixels, although this can vary dramatically from font to font. Below an x-height of 10 pixels, you have very little chance of accurate results, and below about 8 pixels, most of the text will be "noise removed".
So first you need to measure the height of a lower case letter in your image. If the height of a lower-case letter in your text is less than 20 pixels at 300 dpi, you need to preprocess (resize) the documents.
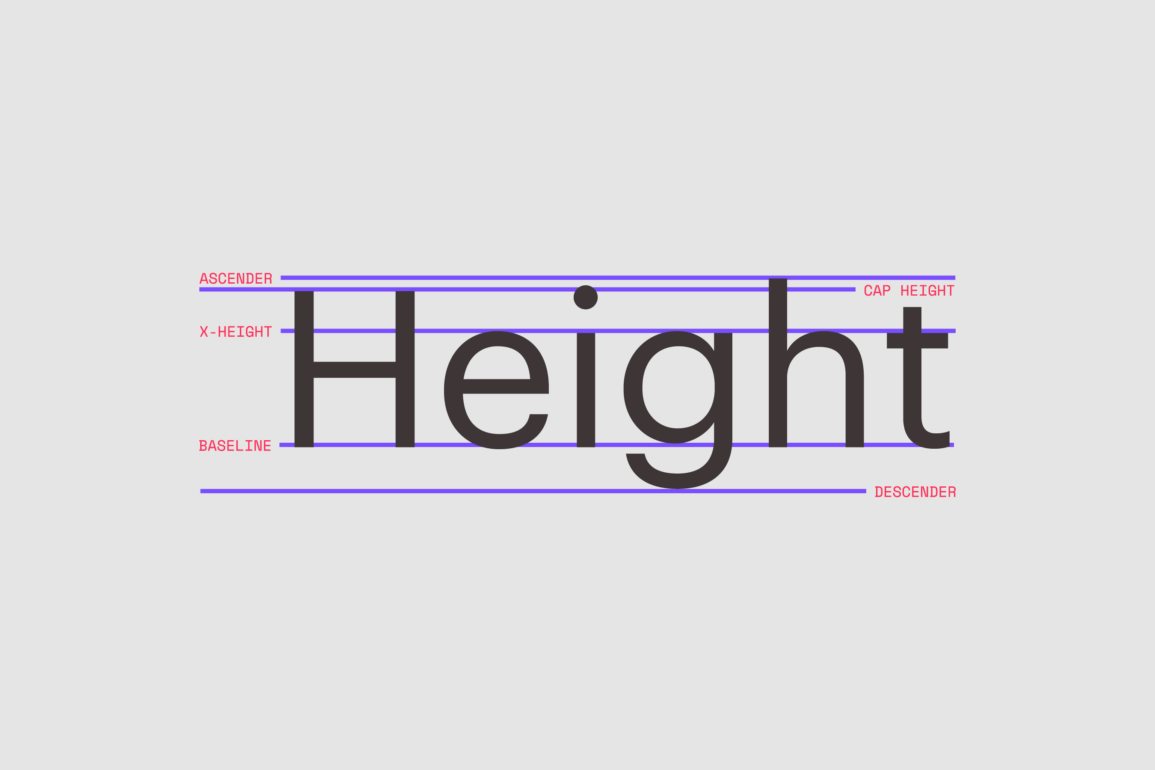
X-height and cap height of letters.
There has also been some research done which showed that Tesseract gives best OCR results when capital letter size (cap height) is between 20 and 40 pixels.
The Tesseract documentation says: "Using LSTM there seems also to be a maximum x-height somewhere around 30 px. Above that, Tesseract doesn’t produce accurate results. The legacy engine seems to be less prone to this."
Based on the statements above the general recommendation about the text size can be the folowing.
Recommended letter height for accurate Tesseract OCR results: x-height between 20px and 30 px, cap-height between 20px and 40px.
There is also a useful conversion formula to calculate the point size of a character based on its pixel height and DPI. Since 1 pt = 1/72 inch to convert the size in pixels to a size in points we can use the following formula:
With Pixel Height = 13 pixels and DPI = 250, Point Size = (13 * 72 )/ 250 , Point Size ≈ 3.744
Text alignment
It is critical to have text properly aligned within an image for good OCR quality. Because of wrong orientation or skewed text Tesseract OCR engine might fail to segment the lines and words in an image properly. It will drastically impair OCR accuracy. Besides, tagging process over a text document with skewed lines can be quite challenging and even make correct tagging of certain values impossible.
Text color and contrast
Tesseract works by analyzing the contrast between foreground (text) and background in an image to identify and recognize characters. A binary image, where pixels are either black or white, helps in emphasizing this contrast and simplifying the recognition task. Tesseract has its own algorithms of image binarization but it is recommended to convert the image to black and white as an image preprocessing step to guarantee a better OCR result. There is also a number of functions in ImageMagick such as sharpening filters and contrast stretching that can help increase text contrast.
Text background and noise
Noise in the image, such as speckles and artifacts can negatively impact OCR accuracy. Poor document quality, scanner artifacts or background pictures can introduce noise to a scanned image. Tesseract OCR algorithms remove noise during the binarization step but Tesseract may encounter certain types of noise that cannot be effectively eliminated. This limitation can result in decreased accuracy rates when processing such images. It is beneficial to minimize noise through image processing techniques like denoising filters to enhance the readability of the text.
Transparency
What looks like white background can actually be transparent in an image. Transparent or semi-transparent elements, such as watermarks, overlays, or translucent backgrounds can pose challenges for Tesseract OCR algorithms. They can overlap with the underlying text, reduce the contrast between the text and the background, cause character blending and introduce additional noise. Image formats that support transparency, such as PNG and GIF, can potentially introduce transparency-related issues when used with Tesseract OCR. Converting the image to a format that does not support transparency, such as JPEG or TIFF, or usiing ImageMagick options to remove transparency can help mitigate transparency-related issues during OCR.
Improve OCR Accuracy with Image Preprocessing
There is no universal method to enhance the OCR-redability of images. Each image defect can be addressed using specific preprocessing techniques, and a technique that proves effective in one case may bring unfavorable results in another.
In the case of a consistent data set where all documents share a similar origin and quality and were captured under the same conditions, it is possible to optimize the preprocessing chain by experimenting with various combinations of settings and evaluating the overall result. This approach requires a preliminary test of the image preprocessing settings on a representative sample of the documents.
However, when dealing with a diverse range of data sets, the options become limited. The alternative is to test different preprocessing chains and rely on the OCR engine's recognition scores.
Although there is no fixed solution to all the cases there are a few things which should be considered to improve OCR results. Imagemagick has most of the commands required for image preprocessing operations.
If a document image needs preprocessing the following basic ImageMagic functions can be used:
- Image resolution: (-density, -resample)
- Image scaling (-resize)
- Image rotation (-rotate, -auto-orient)
- Image de-skewing (-deskew)
- Image binarization (-threshold, -colorspace, -type)
- Remove noise ( -despeckle, -enhance, -morphology open/close)
- Enhance contrast (-conrast-stretch, -normalize, -lat)
- Enhance sharpness (-unsharp)
- Remove transparency (-alpha)
- Image cropping (-crop)
Image Preprocessing Example
Let’s consider a text image example and the preprocessing steps used to prepare it for good quality recognition with Tesseract OCR.
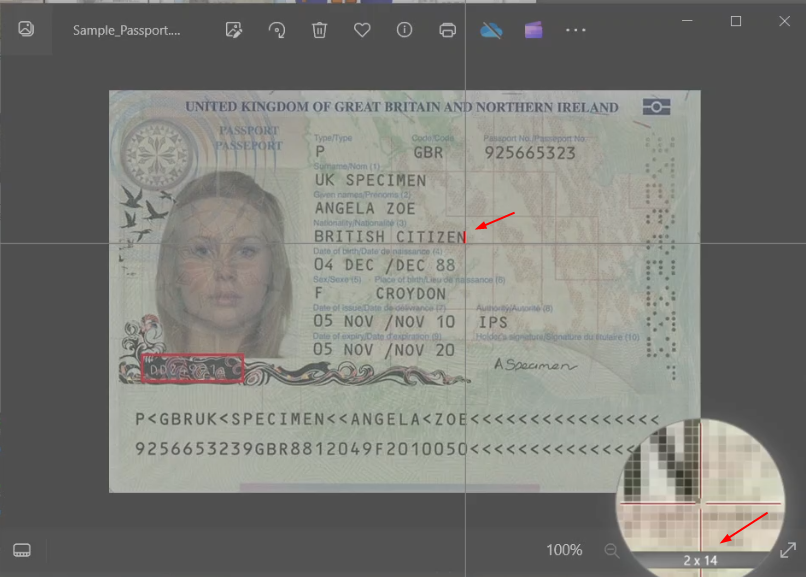
For this example, we will work with a color passport scan measuring 693x471 pixels at 250 dpi.
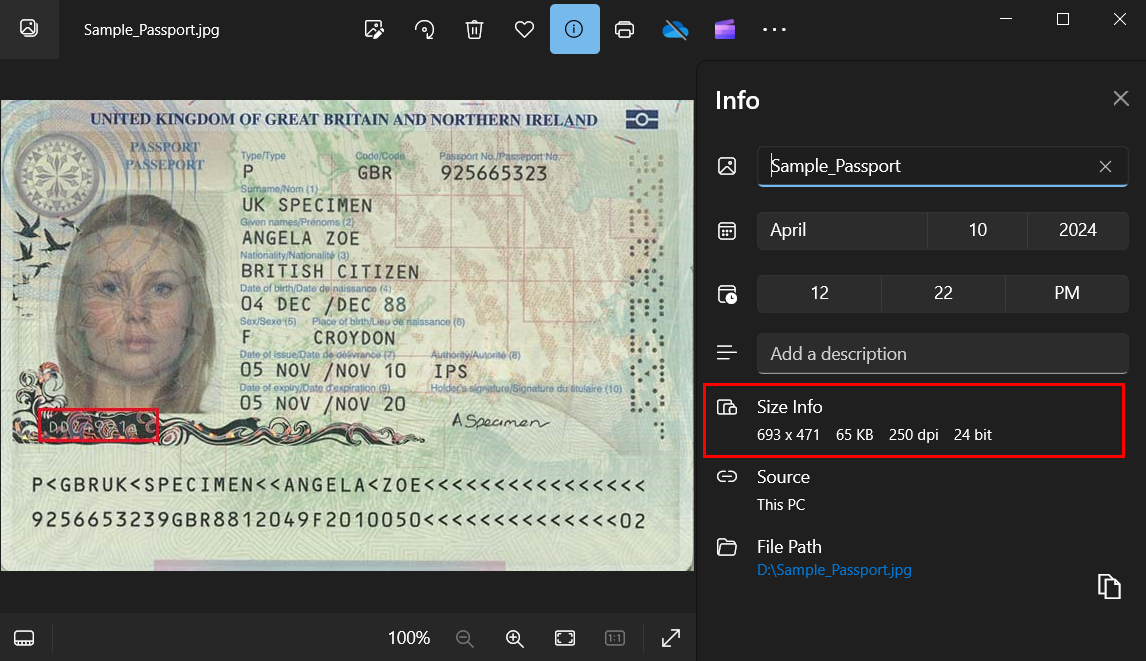
Step 1 . Analyze image quality.
Let's analyse image quality and suitability for OCR first:
- Its native resolution is not bad but it’s below recommended (250 dpi but 300 dpi recommended).
- The capital letter height is 14 pixels (we should have at least 20px) .
- It is a color image and has color variations across different areas
- There are a lot of artifacts and noise in the background
- Text doesn’t have enough contrast against the background
Several preprocessing transforms will be required to enhance the document for accurate OCR with Tesseract.
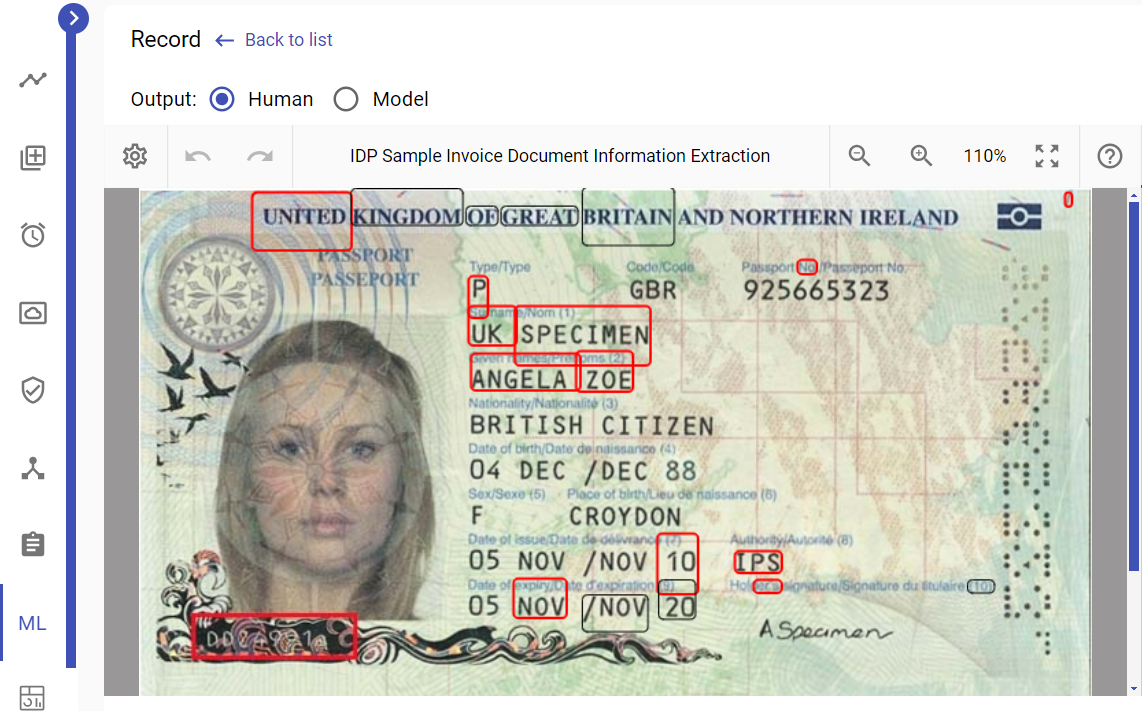
Step 2. Apply ImageMagick Default Settings with 300 DPI.
When creating a new Document Set on EasyRPA Control Server the default ImageMagick Settings are provided in the Document Set configuration json. The settings provide a good basis for improved OCR accuracy:
- -units PixelsPerInch: sets unit of measurement to pixels per inch for consistency.
- -resample 180: increases resolution to 180 ppi/dpi which is enough for text clarity of good quality images without huge file sizes.
- -density 180: matches density to resampled resolution.
- -quality 100: maintains full quality without JPEG compression loss during processing.
- -background white: fills transparency with white background for better contrast during binarization.
- -deskew 40%: attempts to straighten images up to 40% skew which is usually enough to fix minor skewed images of good quality.
- -contrast: enhances the intensity differences between the lighter and darker elements of the image.
- -alpha flatten: merges any alpha channels into the final layer for simplicity.
- We will apply these settings with the only tweak of a higher resampling to 300dpi since it’s a low quality scan.
We will apply these settings with the only tweak of input image resolution of 300dpi and resampling output image to a higher 300dpi since it’s a low quality scan and run Preprocess.
Output result: Despite 300 dpi, a lot of fields are not recognized, additional enhancements are necessary. Capital letter height is 17 pixels.
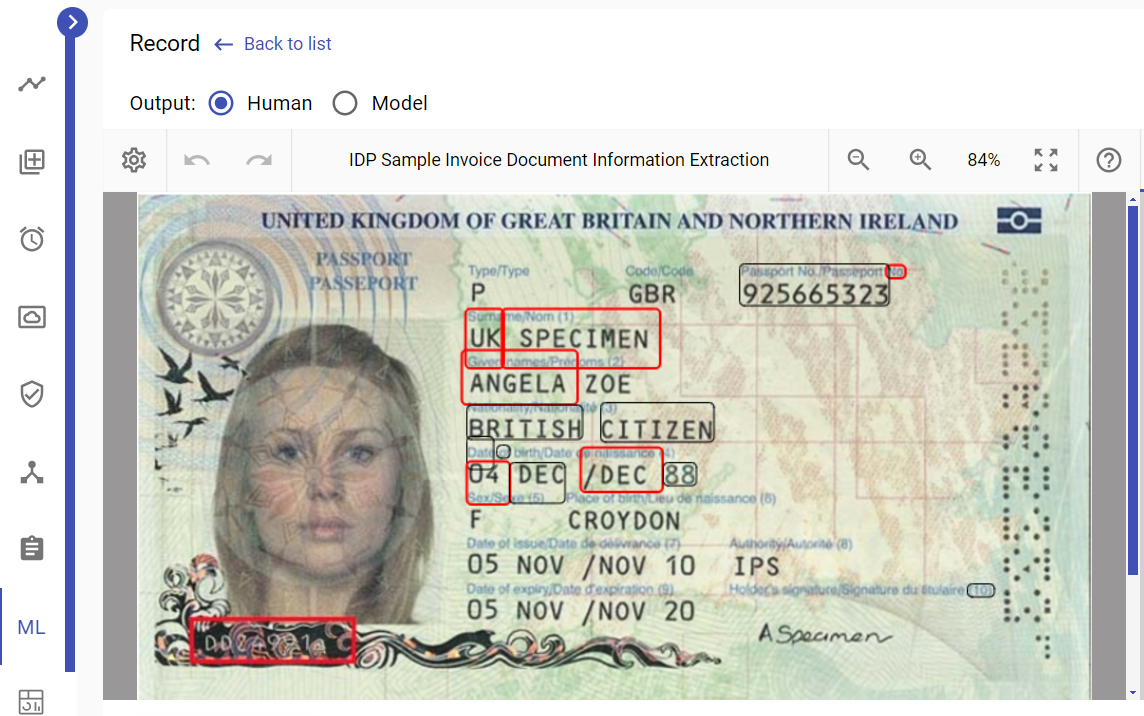
Step 3: Increase Letter Height with Resize
We add "-resize", "130%" to ImageMagick Options to increase the capital letter height and run Preprocess.
Output result: Capital letter height is now 21px. However, the overall OCR performance remains unsatisfactory.
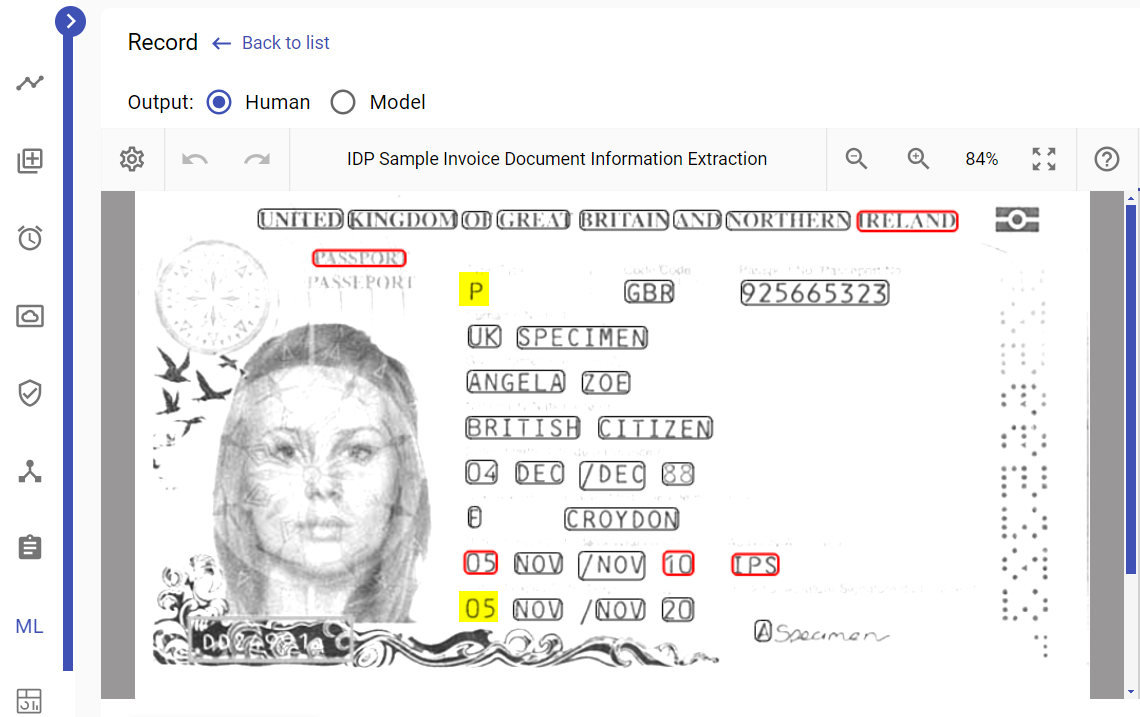
Step 4: Background Artifact Removal with Modulate
Observing that the image is not binary and contains artifacts in the background, the next step involves adding the "-modulate" command with parameters "165, 0, 100" to the previous settings. This action converts the image to grayscale and effectively removes background noise by increasing brightness.
Output result: The OCR accuracy significantly improves, with only two fields remaining unrecognized.
Step 5: Enhance Bounding Boxes with Unsharp Mask
To further refine the OCR results, the "-unsharp" command is employed with a parameter of "0x1". This step sharpens the image and results in precise and well-defined boundaries for the characters.
Output result: All fields in the passport scan image are successfully recognized.
Here are the full ImageMagick settings that we used in this example to get the final result:
Resources:
Image Quality for Tesseract OCR:
https://tesseract-ocr.github.io/tessdoc/ImproveQuality.html
Text Size for Tesseract OCR:
https://groups.google.com/g/tesseract-ocr/c/j-0-8v2gw6Y
https://willus.com/blog.shtml?tesseract_accuracy
https://groups.google.com/g/tesseract-ocr/c/Wdh_JJwnw94/m/24JHDYQbBQAJ
Points vs Pixels in Letter height:
https://graphicdesign.stackexchange.com/questions/199/point-vs-pixel-what-is-the-difference
https://www.imagemagick.org/discourse-server/viewtopic.php?t=26104
ImageMagick:
https://www.imagemagick.org/script/command-line-options.php