Screen Driver
Screen Driver
This page describes only Screen Driver specific features and methods which may be different in other drivers.
Implementation which is common for all drivers is described in Drivers page. Please, read it before.
ScreenDriver uses image template-based desktop automation. In general, image-based locators are quite fragile and should be used as a last resort.
In most desktop applications, a lot can be accomplished by using keyboard shortcuts, and since we can control the keyboard, we can use them directly. Check the documentation for the application you are automating to see what is available.
In image template-based desktop automation, you provide the robot with screenshots of the interface's parts that it needs to interact with, like a button or input field. The images are saved together with your automation code. The robot will compare the image to what is currently displayed on the screen and find its target.
Using this same technique, you can also find a specific part of the interface on the screen and then add an offset in pixels, telling the robot, for example, to "click 200 pixels on the right" of the image that you are providing.
This technique enables automating environments like Citrix and other remote terminals where you don't have access to the target machine itself, but effectively only to a "video stream" of the desktop.
ScreenDriver is used to automate anything on the screen of desktop computer running Windows, Mac or some Linux/Unix.. This driver is based on the sikuliX project.
The ScreenDriver class based on the Screen class - central object of the sikuli library. According to the documentation, class Screen is there, to have a representation for a pysical monitor where the capturing process (grabbing a rectangle from a screenshot, to be used for further processing with find operations is implemented. The ScreenDriver a set of methods to simplify development, but if you need any specific methods from the Screen class, you can turn to it directly. Below are some examples of initialization and use of the driver.
Common challenges of image locator-based desktop automation
When using this approach, these are some of the challenges you should be aware of:
- System settings can impact the recognition of the images: How the interface elements look on a screen depends on system settings like color schemes, transparency, and system fonts. Images taken on a system might end up looking different than the target system, and the robot might not recognize them, stopping the process.
- Screen resolution is a factor: A different screen resolution might cause elements on the screen to move around or change in size.
- Different versions of the same operating system can differ visually: Operating systems provide the general guidelines of how the interface elements are drawn on the screen. If the operating system is updated, image templates might stop being recognized.
To mitigate this type of issues and make your automation less fragile, we recommend:
- sticking to default settings for fonts and colors
- using accessibility options to reduce visual effects like shadows and transparencies
- if possible, using the target machine to take the locator images to ensure that all settings are the same.
Driver Initialization
You can initialize the driver in your automation process by the following way:
@Driver
private ScreenDriver screenDriver;
Driver Parameters
| Param name | Measure | Default Value | Description |
|---|---|---|---|
| DriverParams.All.EXPLICITLY_WAIT_TIMEOUT_SECONDS | seconds | 5 | Wait functions default timeout in seconds. |
| DriverParams.All.EXPLICITLY_WAIT_POLLING_INTERVAL_MILLISECONDS | milliseconds | 500 | Wait functions default pooling interval in milliseconds. |
| DriverParams.All.LAUNCH_APPLICATION_TIMEOUT | ms | 5000 | Parameter is responsible for timeout which driver should wait after it called the command to start application and until application is started. |
| DriverParams.Screen.MIN_SIMILARITY | float | 0.7 | The default minimum similarity of find operations. While using a "findElement" operation, if only an image file is provided, Screen Driver searches the region using a default minimum similarity of 0.7. |
@Driver(param = {@DriverParameter(key = DriverParams.Screen.MIN_SIMILARITY, direct = "0.8")})
private SapDriver sapDriver;
Opening new applications
Use DesktopDriver if you need to start application using driver. Here the link of how to open new application using DesktopDriver
Window management
There is no such entity as "Window" in ScreenDriver, as this driver works with the whole screen like one window and driver can't distinguish between all the different windows on the screen. If you need to perform any window-specific operation (closing, maximizing, etc) you can use a hot-keys.
Working with UI Elements
Prepare screenshots
Screenshots should be taken on the screen where the process is supposed to work. Differences in screen resolution or color scheme may break the process.
Take a screenshot of the necessary element and save it to a file.
We recommend to use an utility that makes it easy to take screenshots. lightshot, for example.- Place this file under project resources ('src/main/resources') folder - in this case any file in this folder or sub-folder can be addressed using relative path, for example 'images/menu-file.png'.
- You can use the relative path of image file (or the full path to file if it is not in resources) as a selector.
Find elements
Please, check the table which locators are supported by ScreenDriver:
| Selector type | Purpose |
|---|---|
| ScreenSearch.image | find regions on a screen matching provided image |
| ScreenSearch.anchor | find region on a screen given anchor and offset |
| ScreenSearch.text | find regions on a screen that contain provided text (OCR involved) |
By Image
Bellow an example of how to find element using "ScreenSearch.image":
ScreenElement imageElement = driver.findElement(ScreenSearch.image("navigation-btn-1.png"));By Anchor
"ScreenSearch.anchor" selector is useful when you can't specify an unique UI area of your target element (because it contains the dynamic text or it's an empty input field, for example), but you can specify some UI area near your target area.
Let's consider the following example, when you need to find a location of "Password" input field:
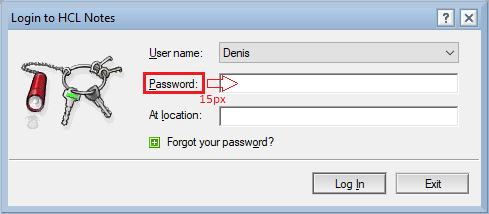
You can't use input field area as a selector, because there is 2 similar empty inputs: "Password" and "At location".
So you can use the area with "Password:" label (which is highlighted in red) as an anchor for password input field. As you know that input follows the label after 15px, your anchor selector will looks like:
ScreenElement passwordLabelAnchor = driver.findElement(ScreenSearch.image("password-label.png"));
int passwordFieldWidth = 250;
int passwordFieldHeight = 20;

ScreenElement passwordInputField = driver.findElement(ScreenSearch.anchor(passwordLabelAnchor, 15, 0, passwordFieldHeight, passwordFieldWidth));
By Text
"ScreenSearch.text" selector will trigger OCR (Tesseract) process to find screen regions containing provided text. Please note that it is the slowest locator of all three.
ScreenElement scientificButton = driver.findElement(ScreenSearch.text("Scientific"));